Veggie Lovers’ Club Sandwich Recipe with Pepperidge Farm

This post has been sponsored by Pepperidge Farm®, all thoughts and opinions are my own.

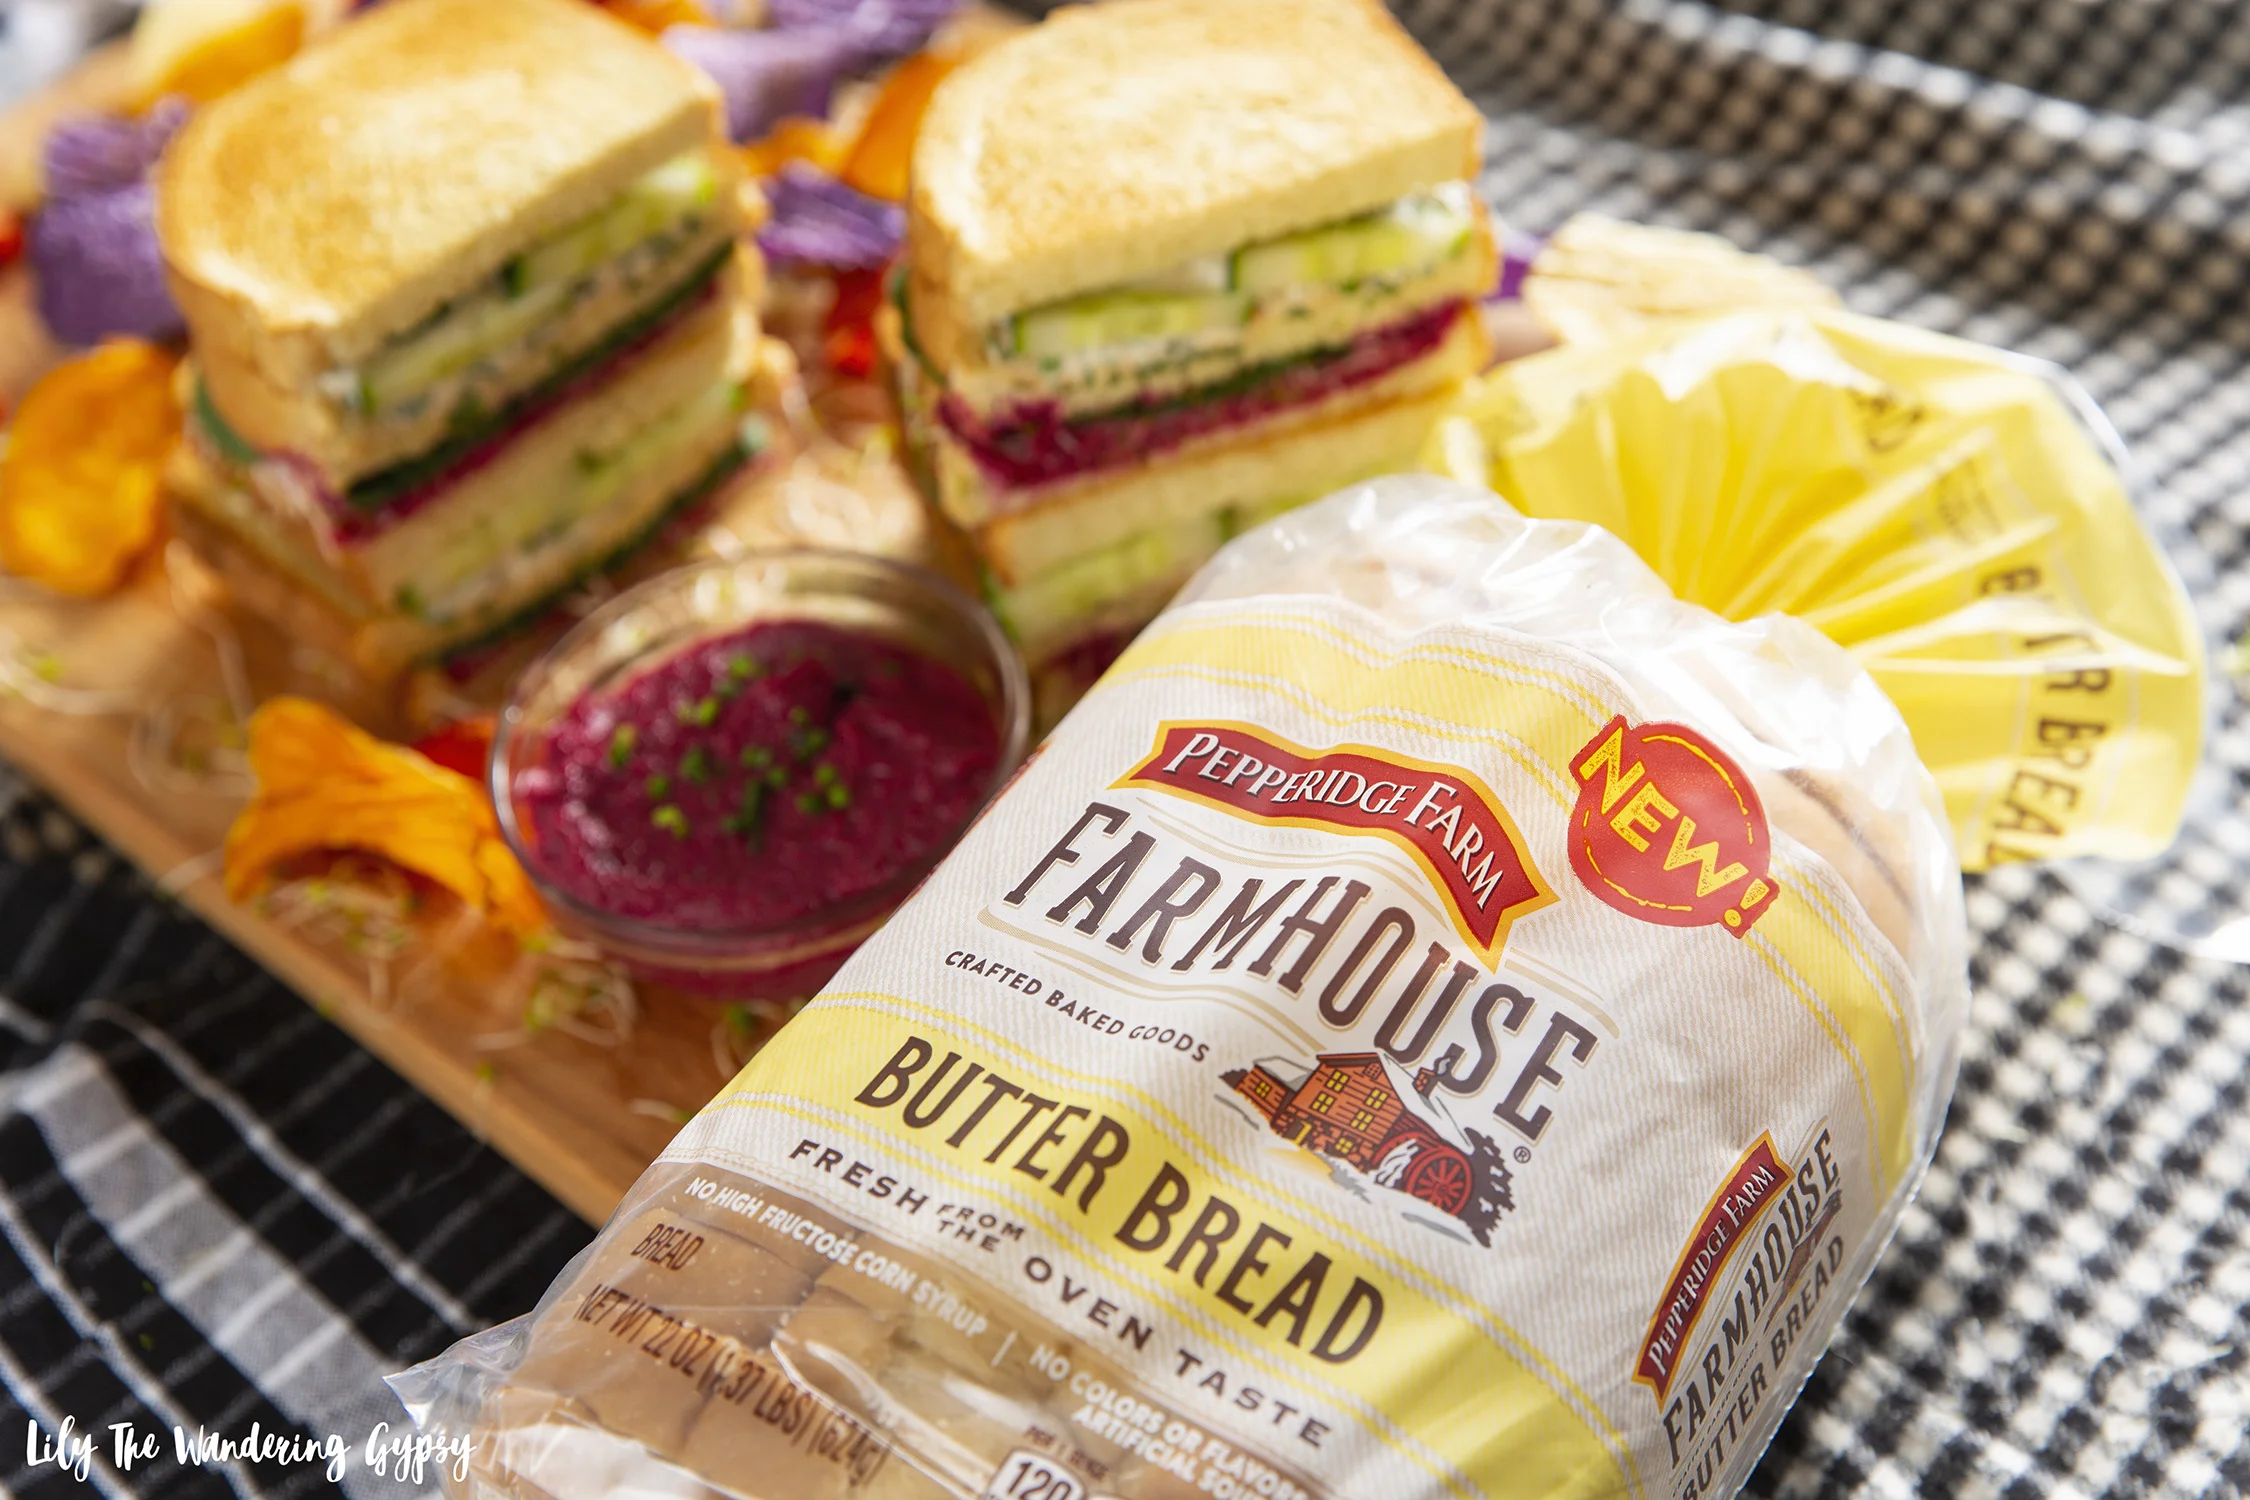
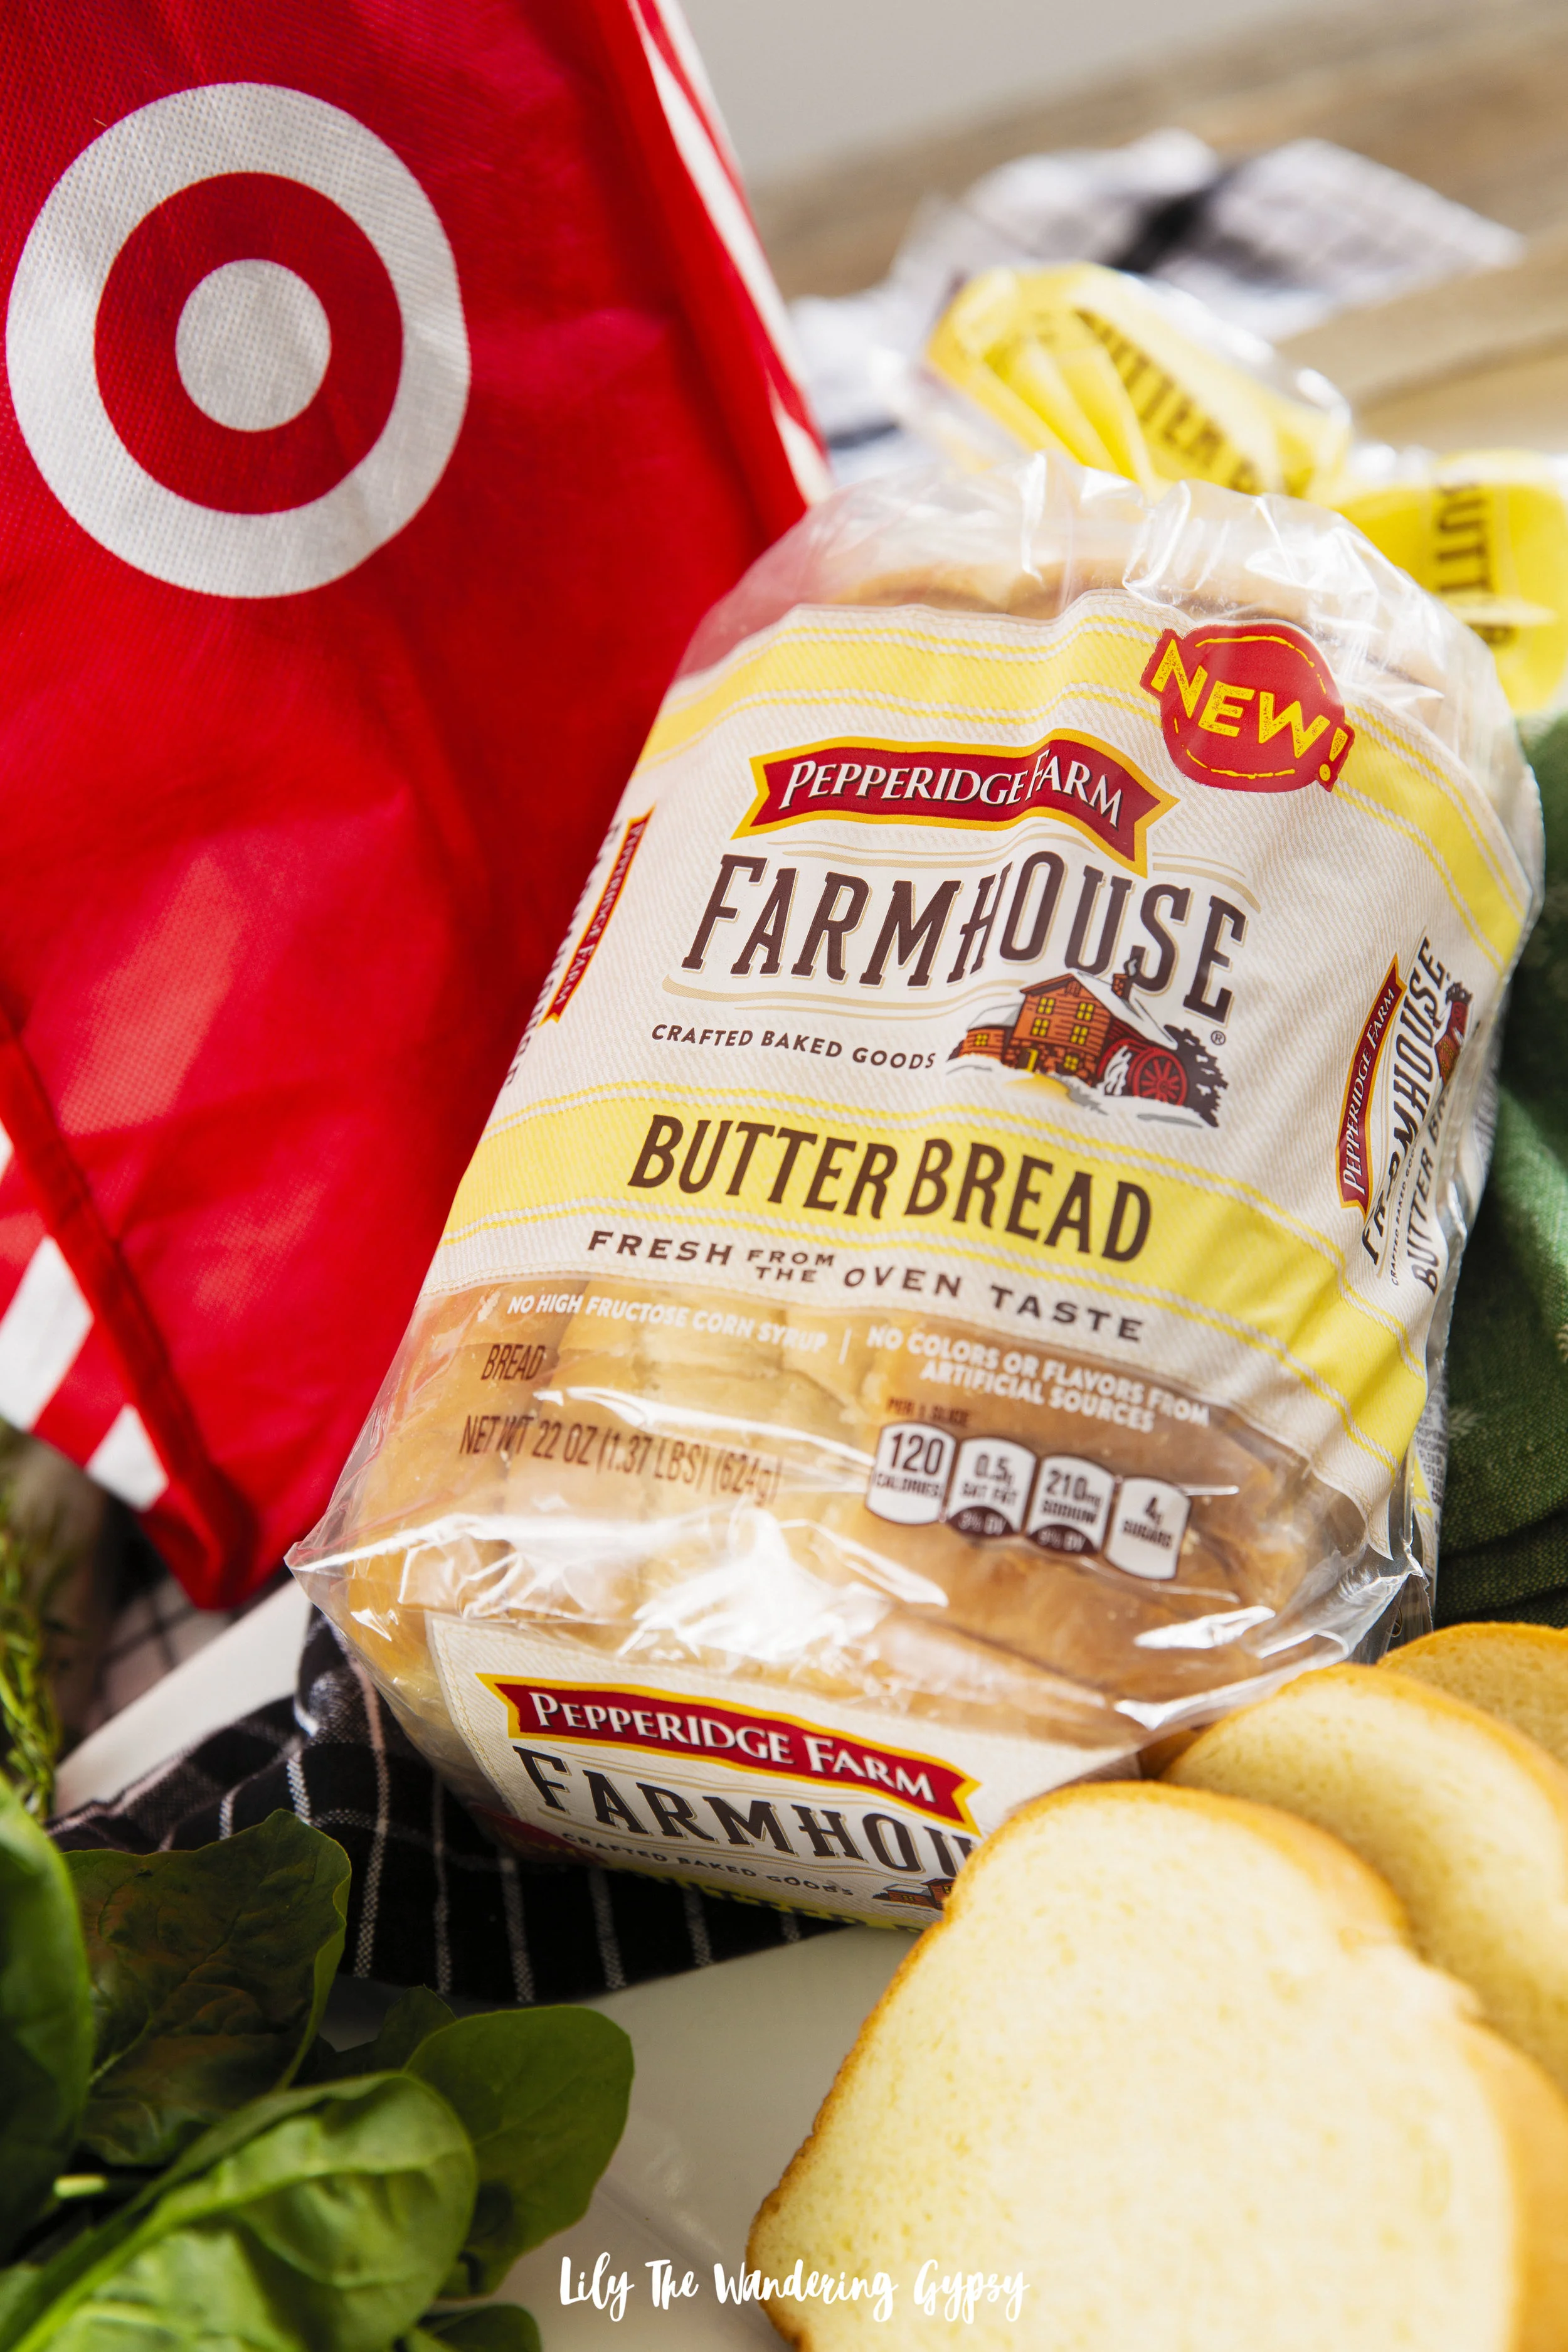
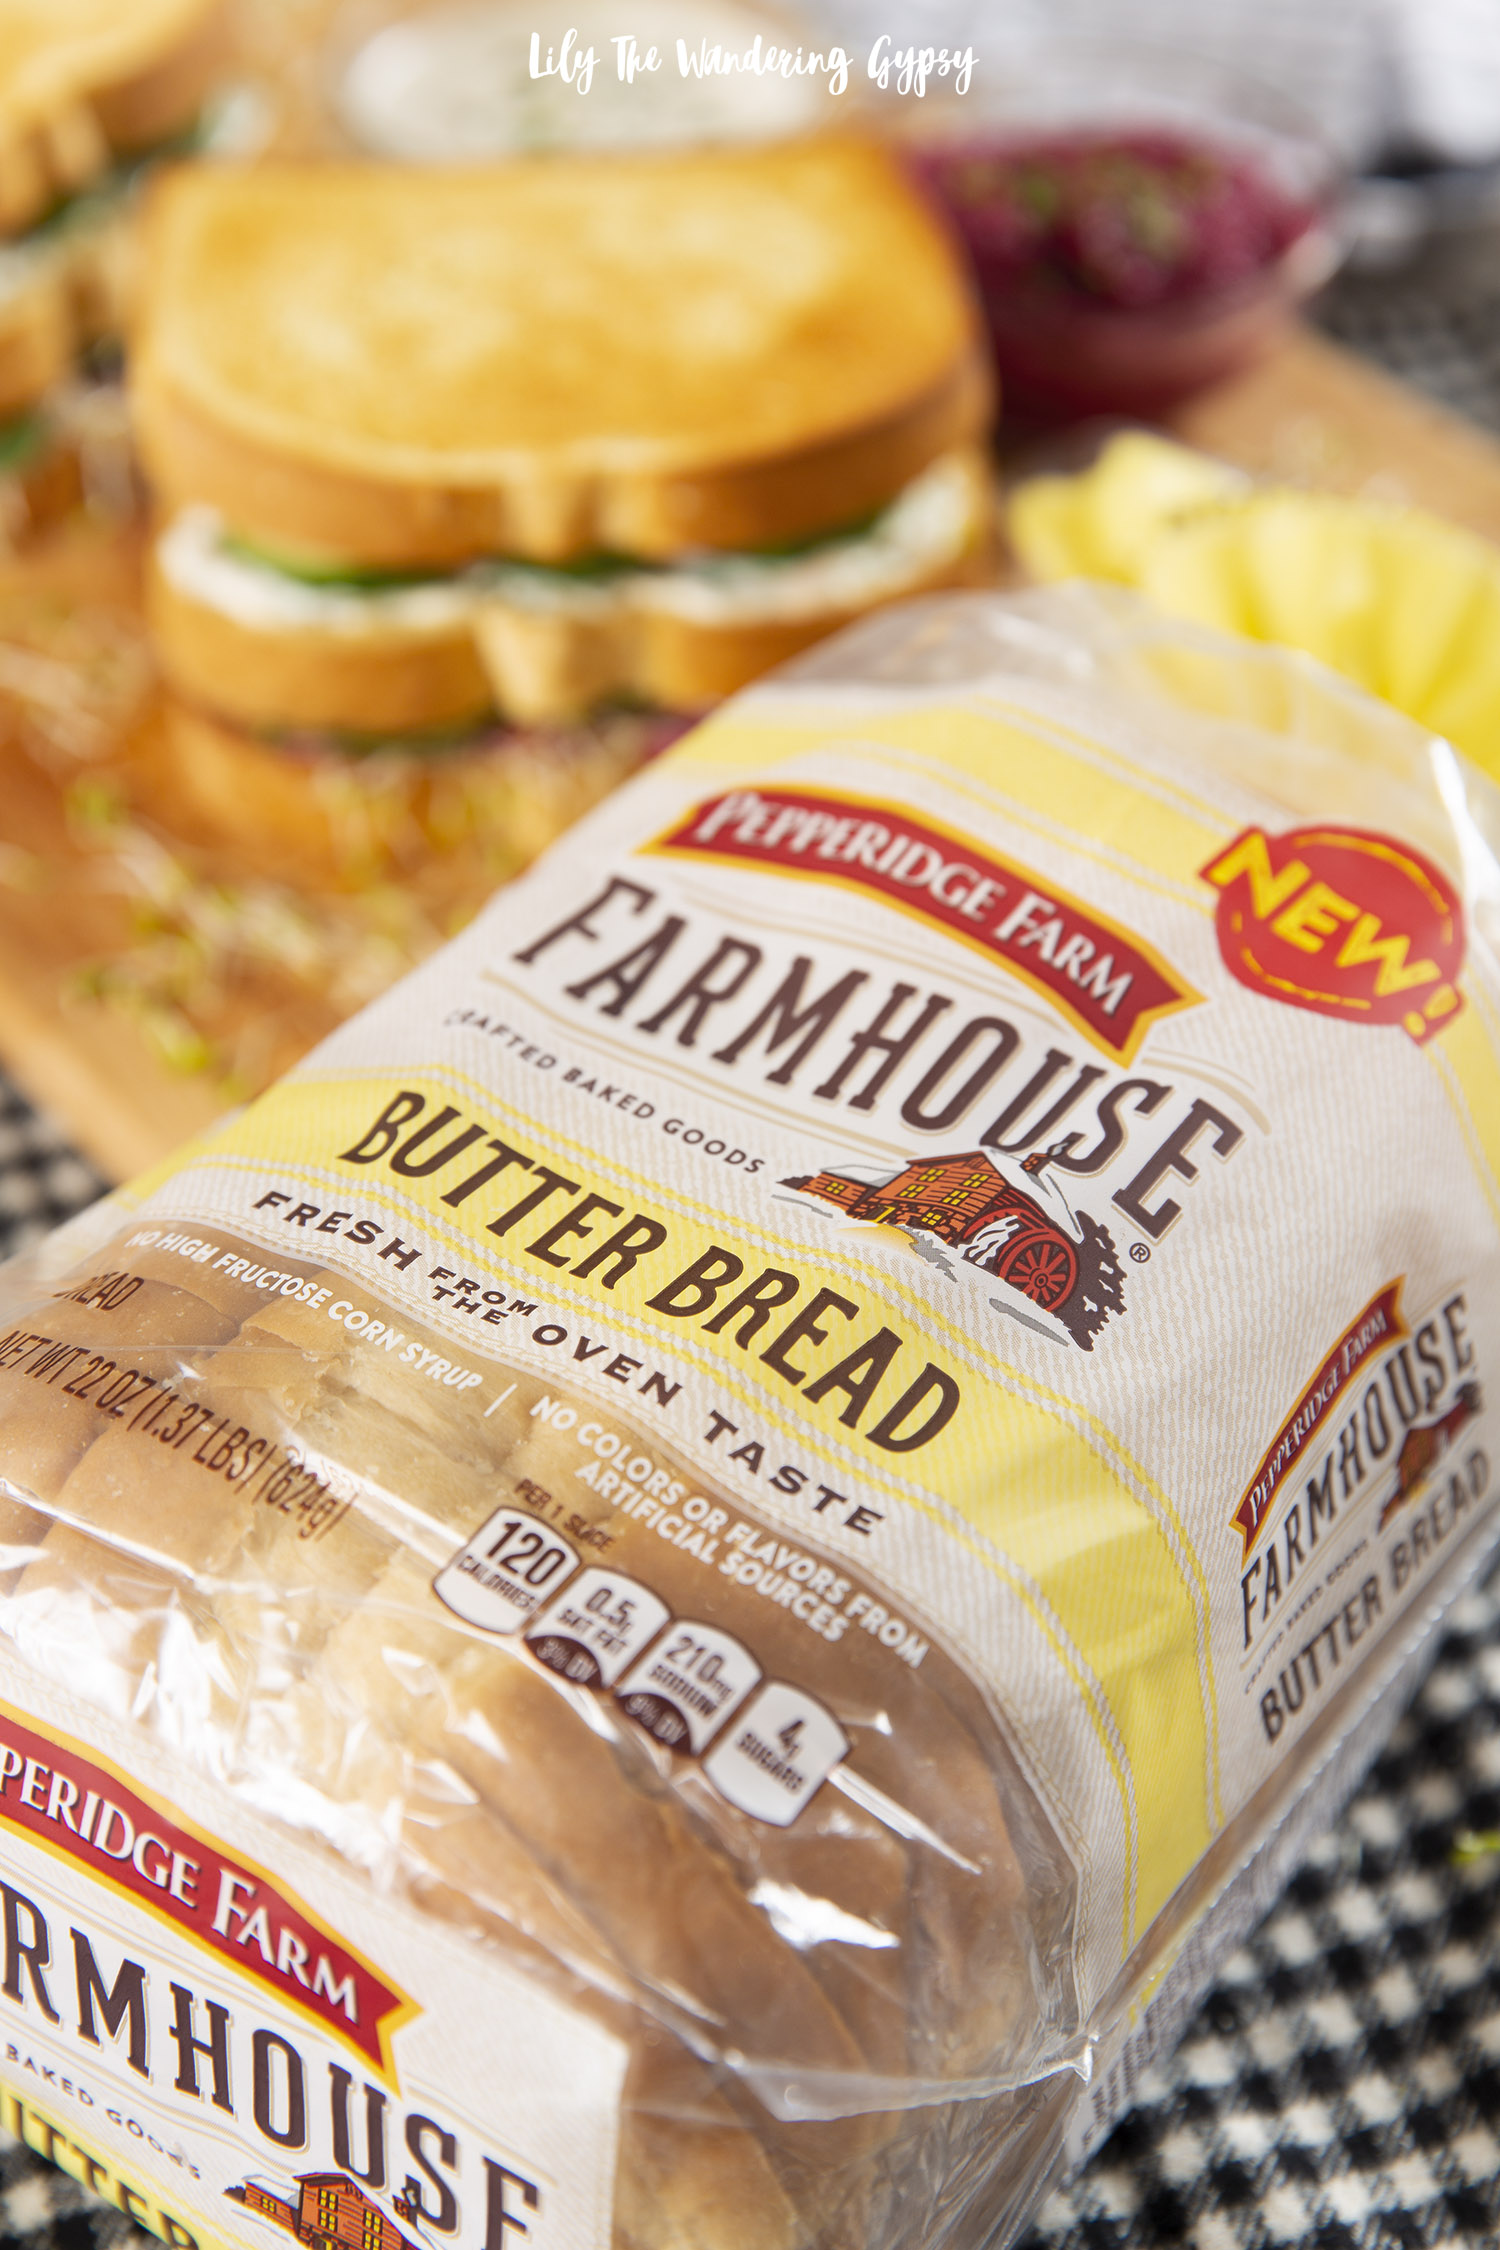
If you’re wanting to find more ways to connect with family or friends, I often find that food brings people together better than nearly anything else. I recently created the most delicious Veggie Lovers’ Club Sandwich with Pepperidge Farm Farmhouse® Butter Bread, and it’s quickly becoming my go-to bread for sandwiches, breakfast recipes, and even making toast, which I love so dearly.

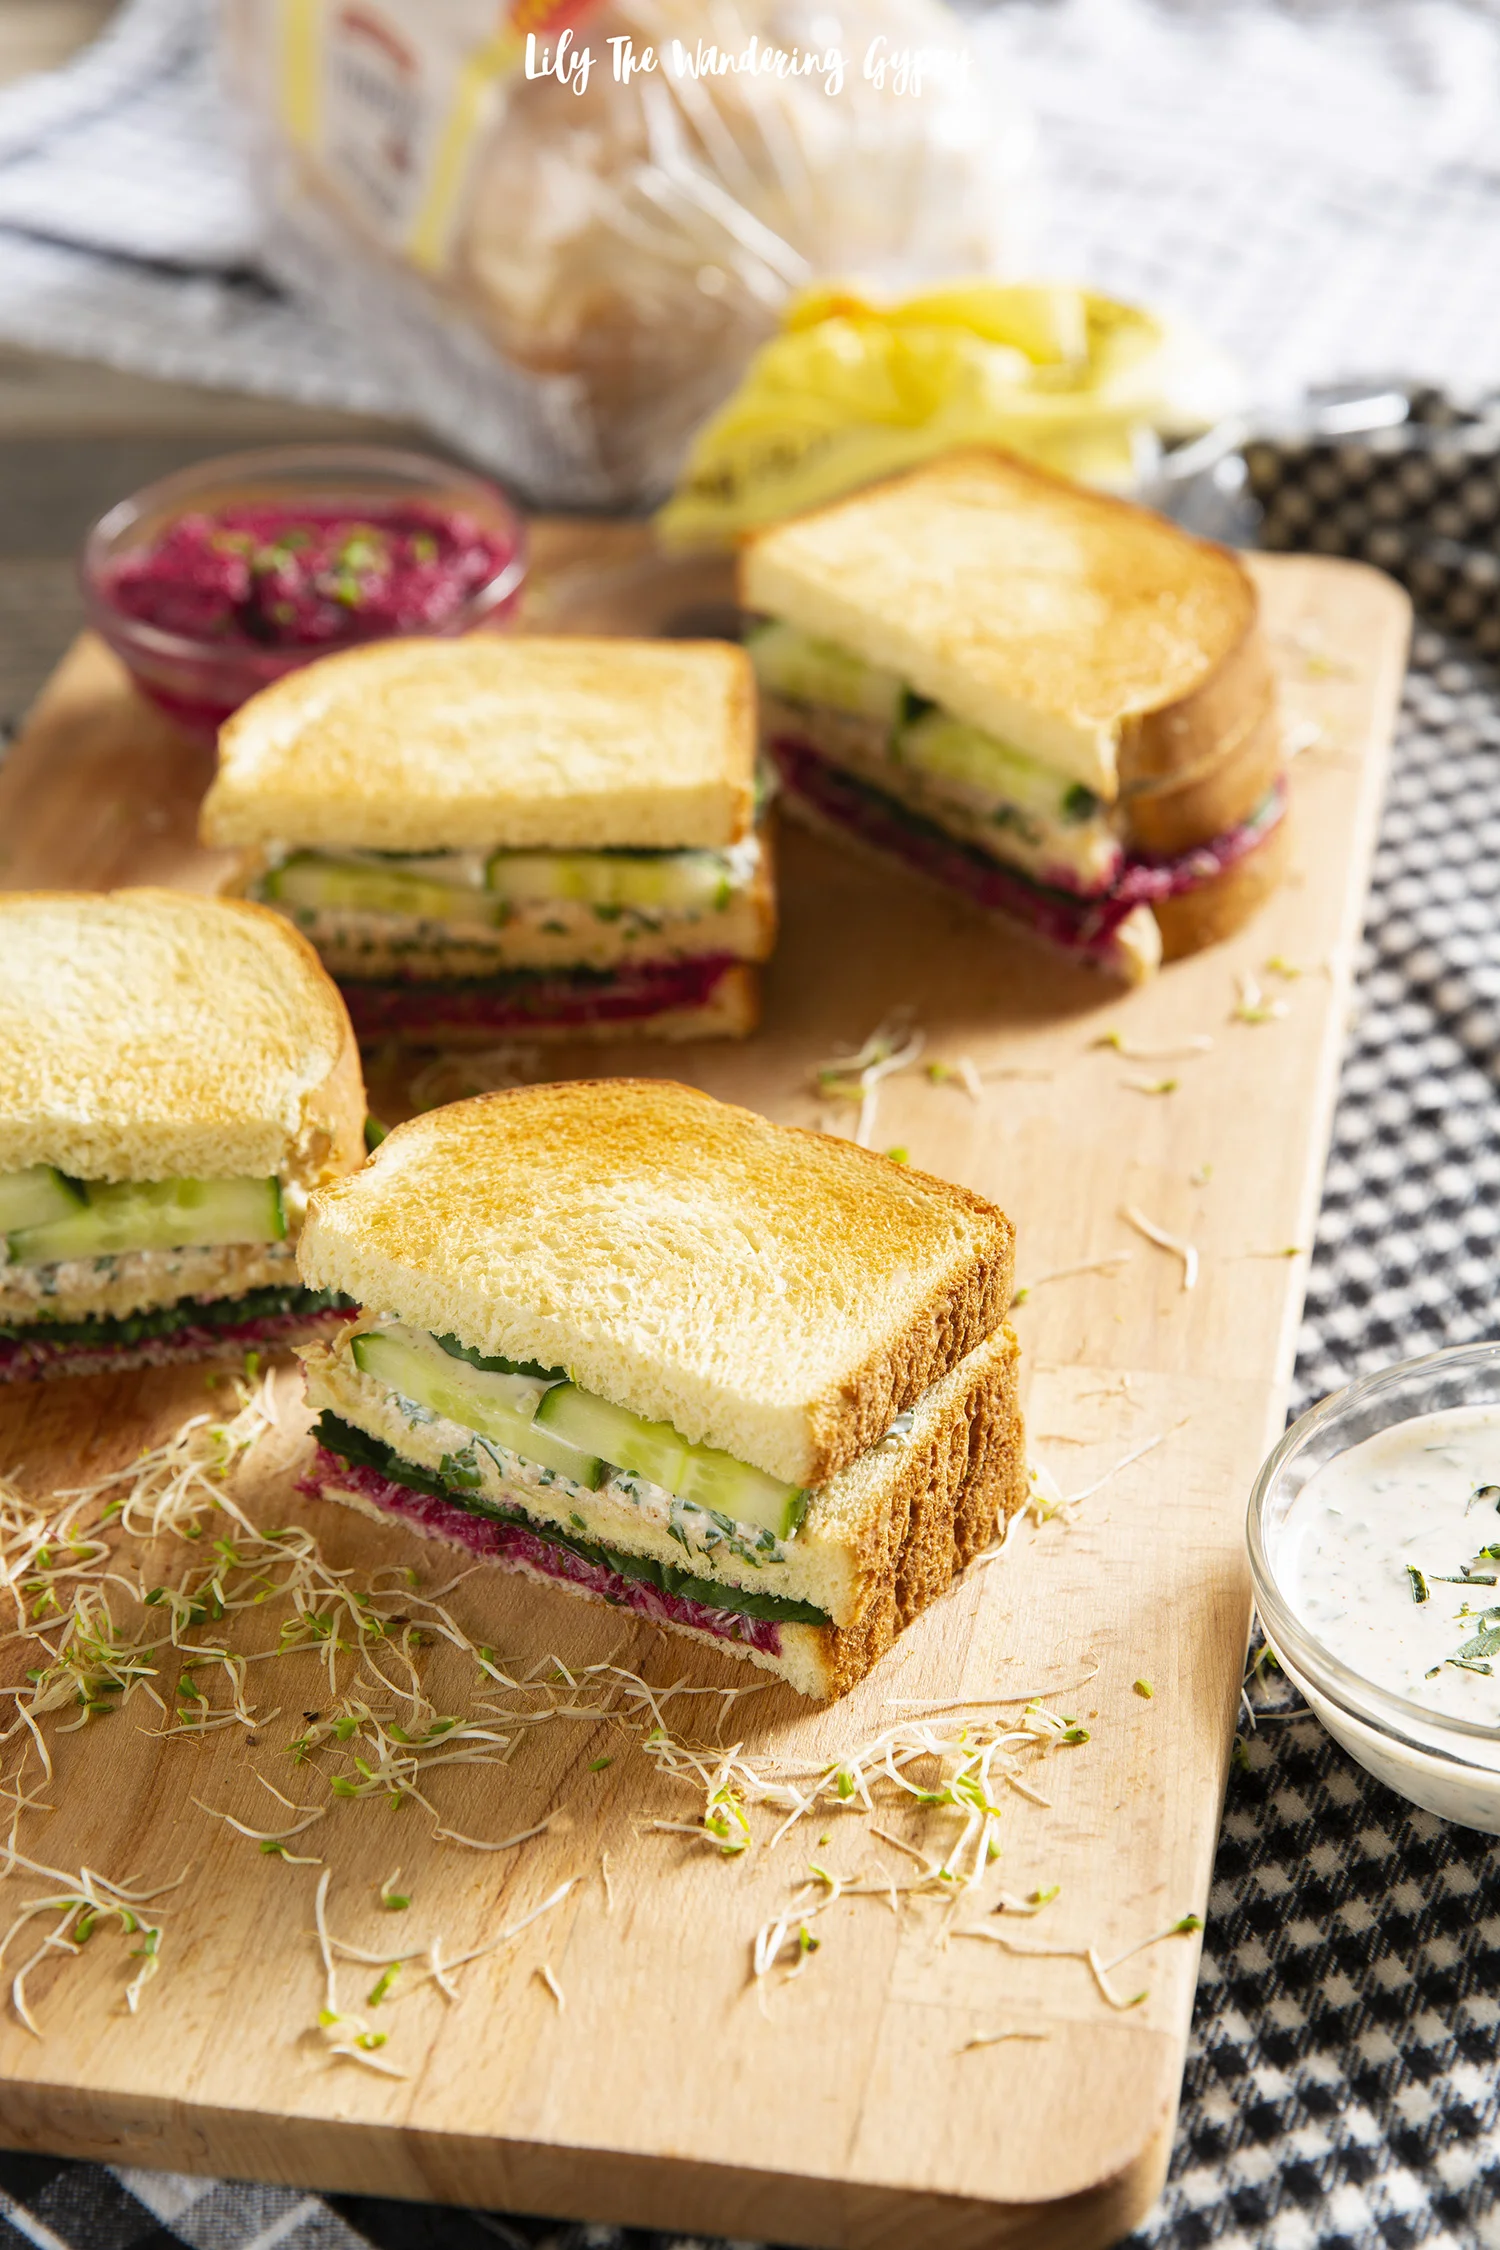
This sandwich contains ingredients in all sorts of colors; I just love to eat as many different colored veggies as possible each day. I hope you enjoy!

I find that sandwiches with fresh and delicious ingredients that can be made ahead of time really helps save time and brings families closer together. I absolutely love providing my friends and family with fresh, nourishing meals that in turn give them energy and encouragement to inspire wonderful days ahead. Whether you’re making this Club Sandwich for two or you’re making brunch for a whole house full of family and guests, I would definitely recommend the thick, rich, buttery taste of this awesome, slow baked Butter Bread – you’re going to love its fresh-from-the-oven taste!

When I visit the bread aisle at the grocery store, I see SO many choices for white bread. But even with all of those choices, few actually compare to this Butter Bread. I love how thick the slices are. Since I am already a huge fan of anything from Pepperidge Farm and I saw that this new flavor was available at a wide range of stores, I was instantly relieved to finally find a white bread with thicker slices and a bit of a buttery taste! YUM!

My boyfriend always jokes that any product that has butter in the name, I will love. Well, he is completely correct about that – I was seriously SO excited when I found out that one of my recipes contained butter bread, I nearly jumped for joy. That’s how much I love butter!

Find new Pepperidge Farm Farmhouse® Butter Bread at retailers like Target and Kroger here! This product may quickly become your FAVORITE new bread for every recipe you can imagine.

This Veggie Lovers’ Club Sandwich is such a fun way to spend more time together and also experience new and different ingredients and flavors – which is a super fun way to bond with those you love. Find joy in the simple flavors of these all-natural sandwich toppings!

INGREDIENTS (MAKES 2 SANDWICHES)

FOR THE SANDWICH:

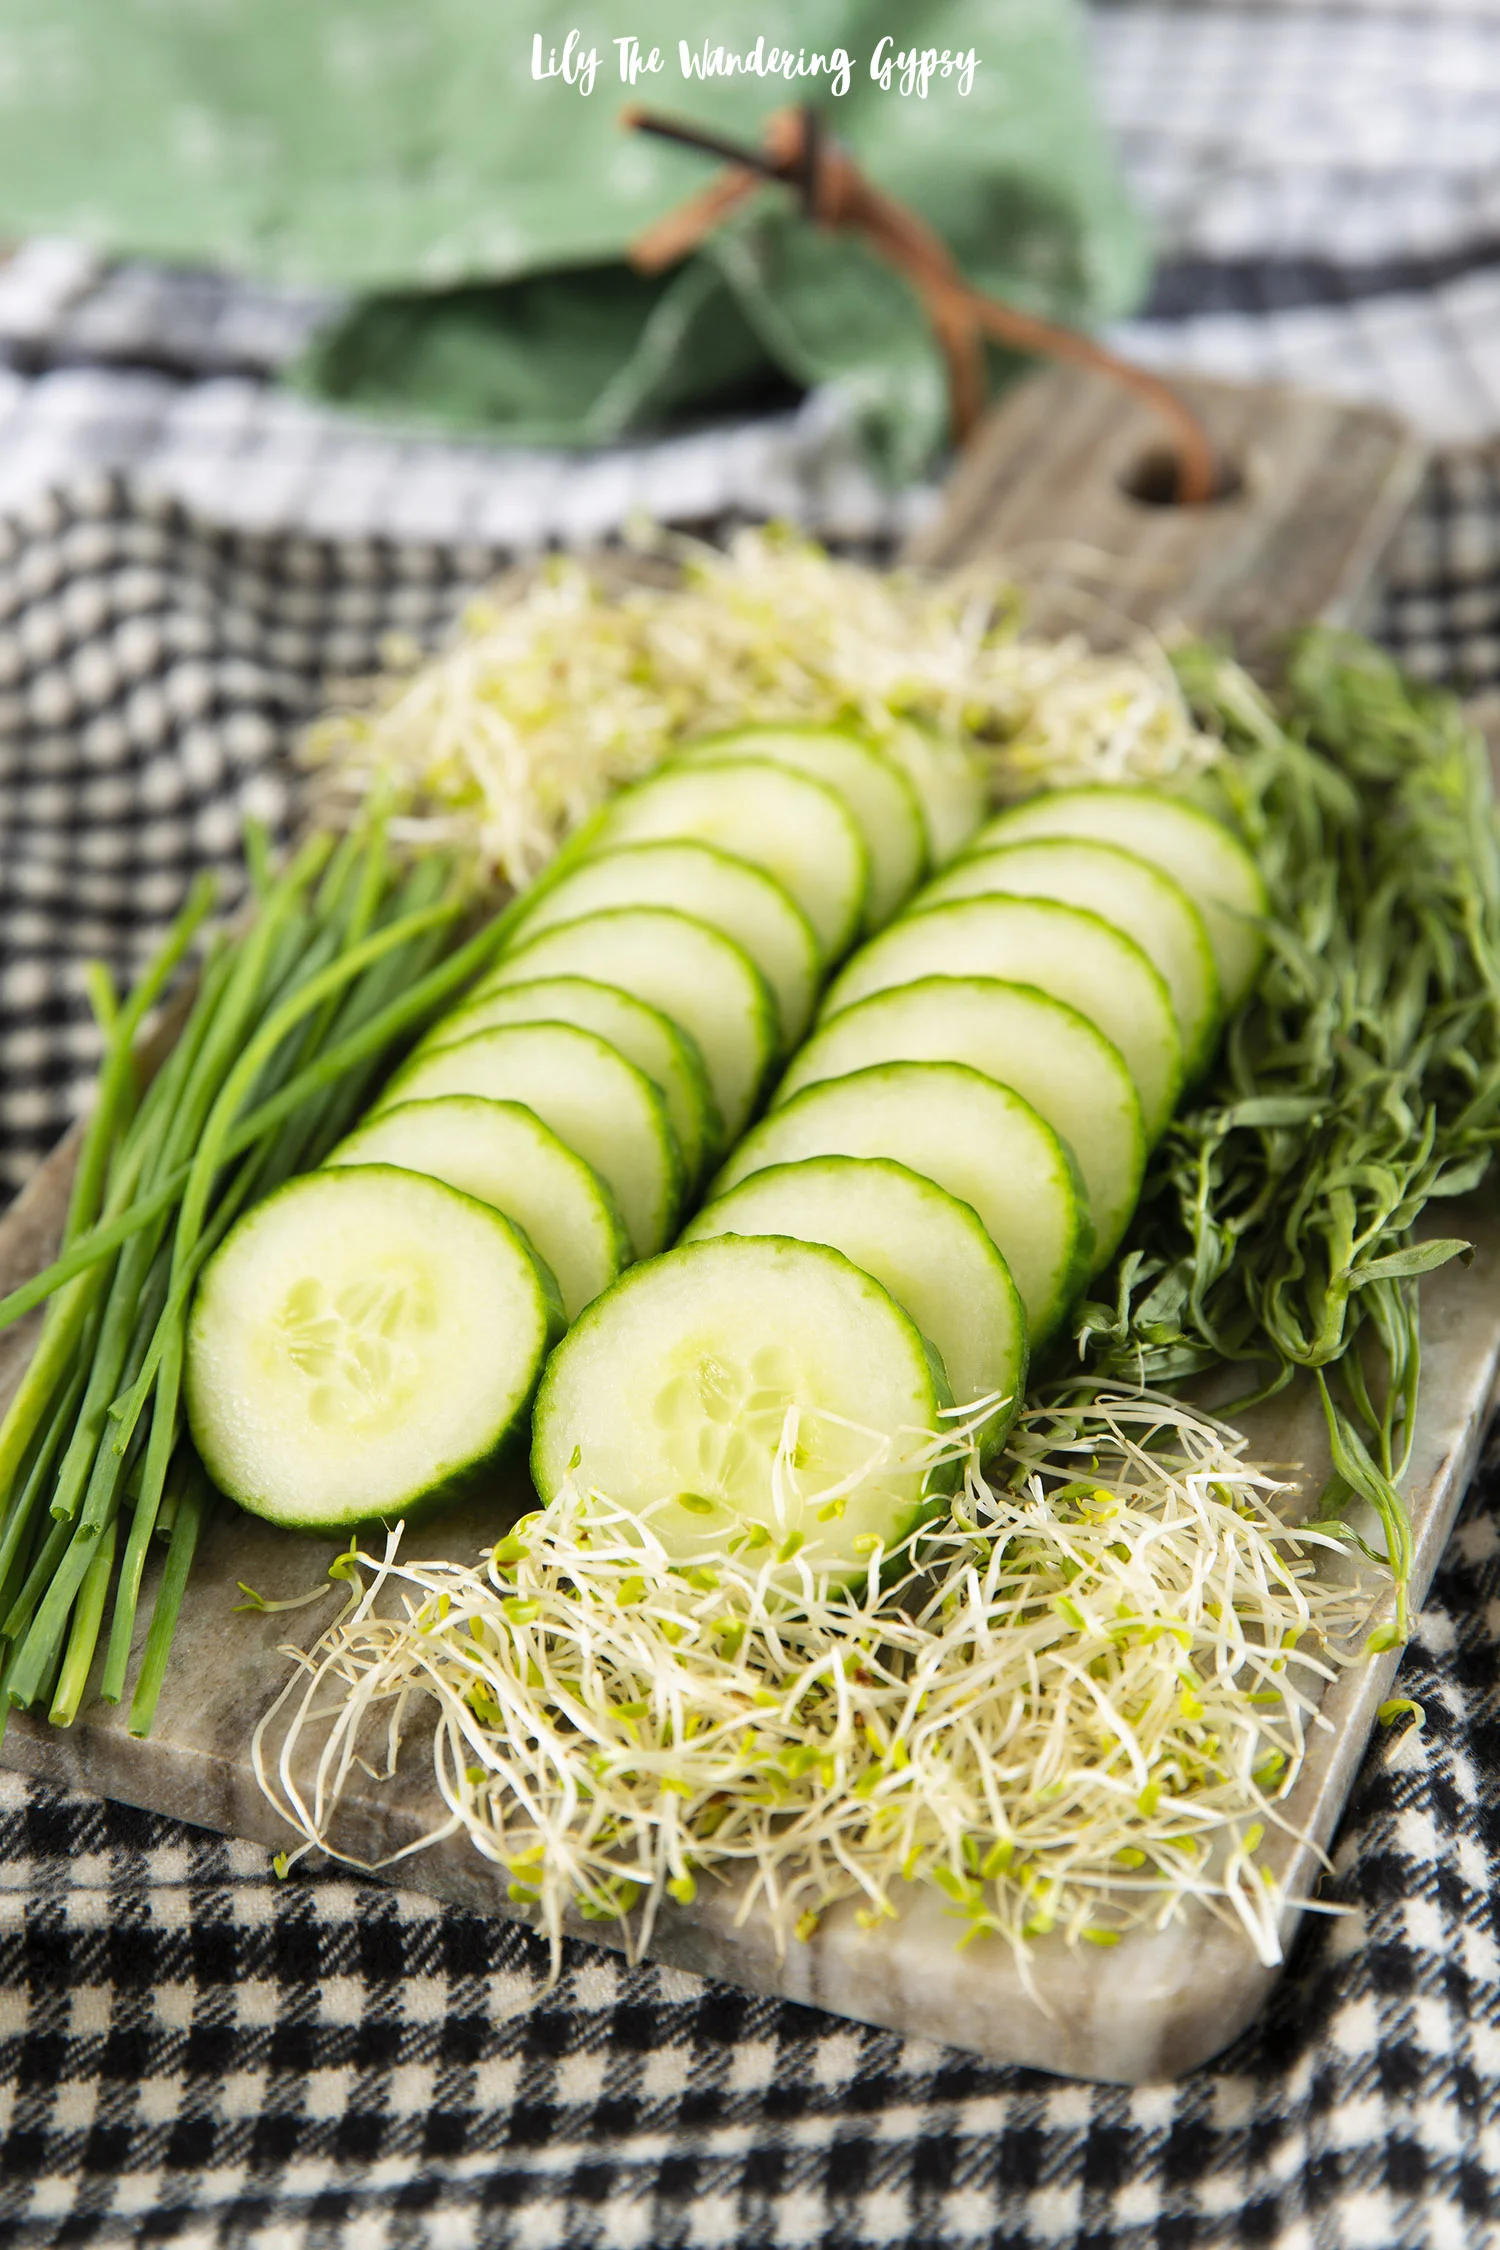
6 slices of Pepperidge Farm Butter Bread

8 spinach leaves

10 slices of English cucumber

½ - 1 Cup sprouts (any flavor you like)

Toaster for bread

Food processor for beet spread

FOR THE BEET SPREAD:

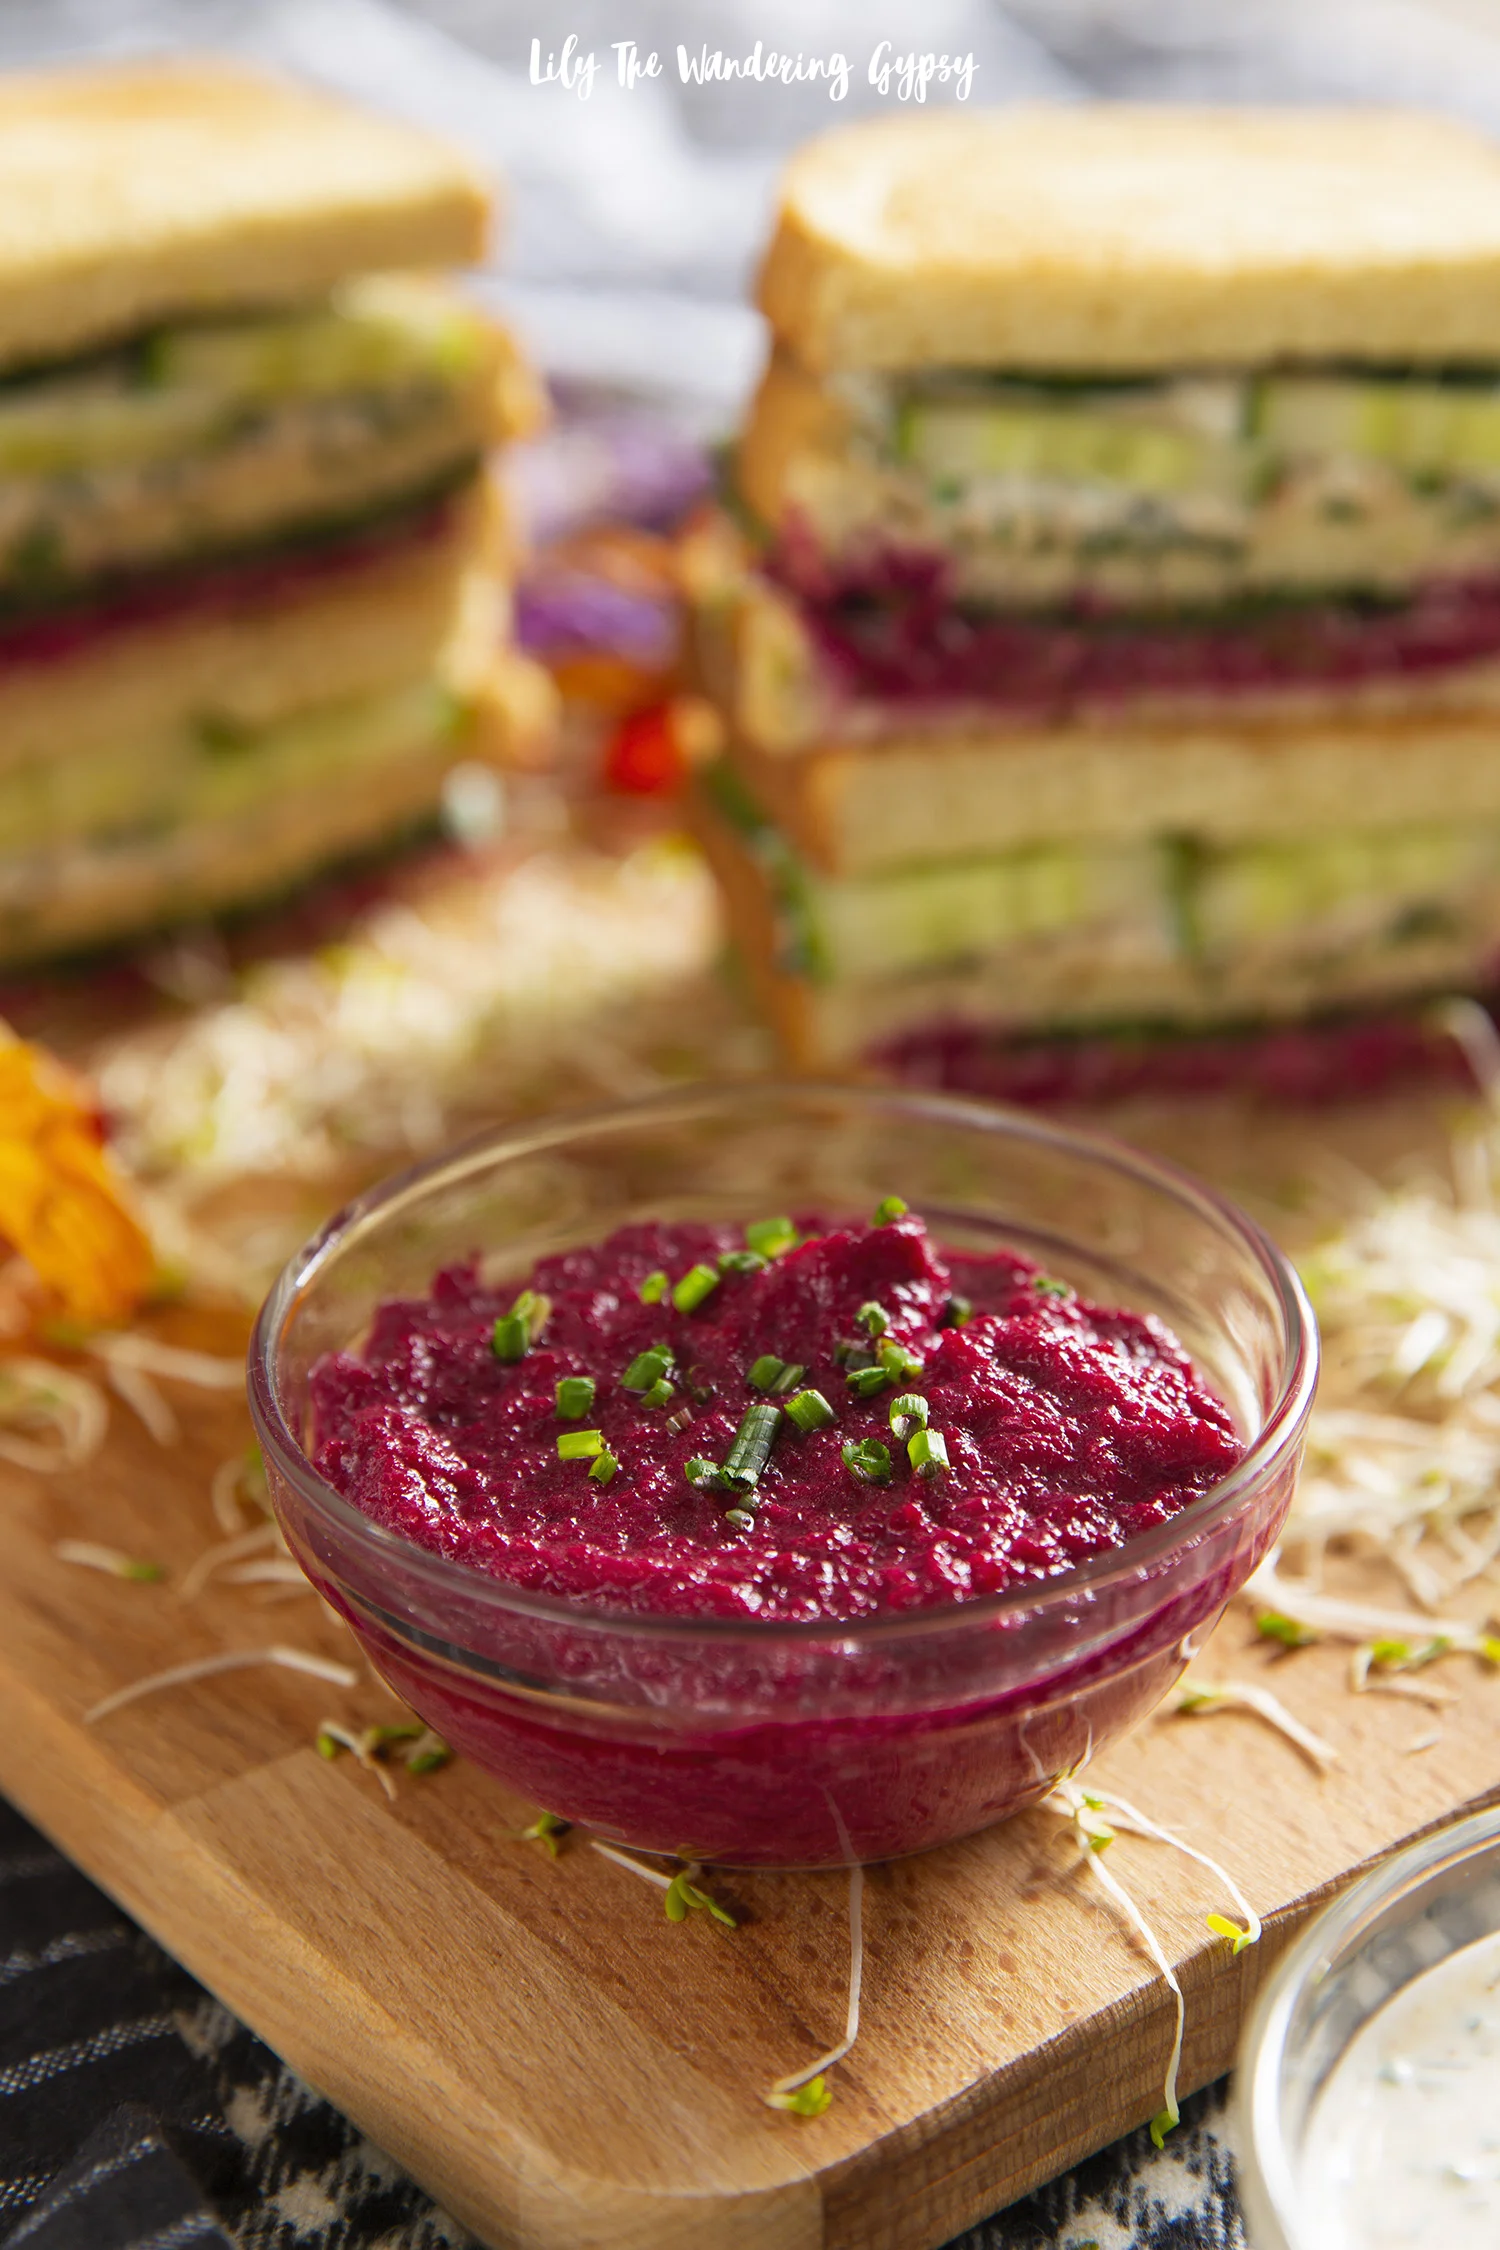
1 package of pre-cooked beets or 1 can of beets (remove any liquid)

2-3 tsp olive oil

3 tsp balsamic vinaigrette

½ tsp salt

1 tsp Italian seasoning

(topped with chives – optional)

FOR THE GREEN GODDESS SANDWICH SPREAD:

¼ C. Greek yogurt (use non-dairy alternative for vegan)

1/8 C. mayo (use non-dairy alternative for vegan)

¼ C. finely chopped chives

2-3 Tbsp freshly chopped tarragon

1-2 tsp salt

1 tsp garlic powder

INSTRUCTIONS:

1.) Make Beet Sauce by putting all ingredients into food processor or blender, and pureeing until smooth. Add more salt if desired.

2.) Make Green Goddess Sandwich Spread by mixing all ingredients in a small bowl with a spoon until well combined. Feel free to add more salt, garlic powder, or any other seasonings you enjoy.

3.) Toast 6 slices of Butter Bread and get ready to make the Club Sandwich.

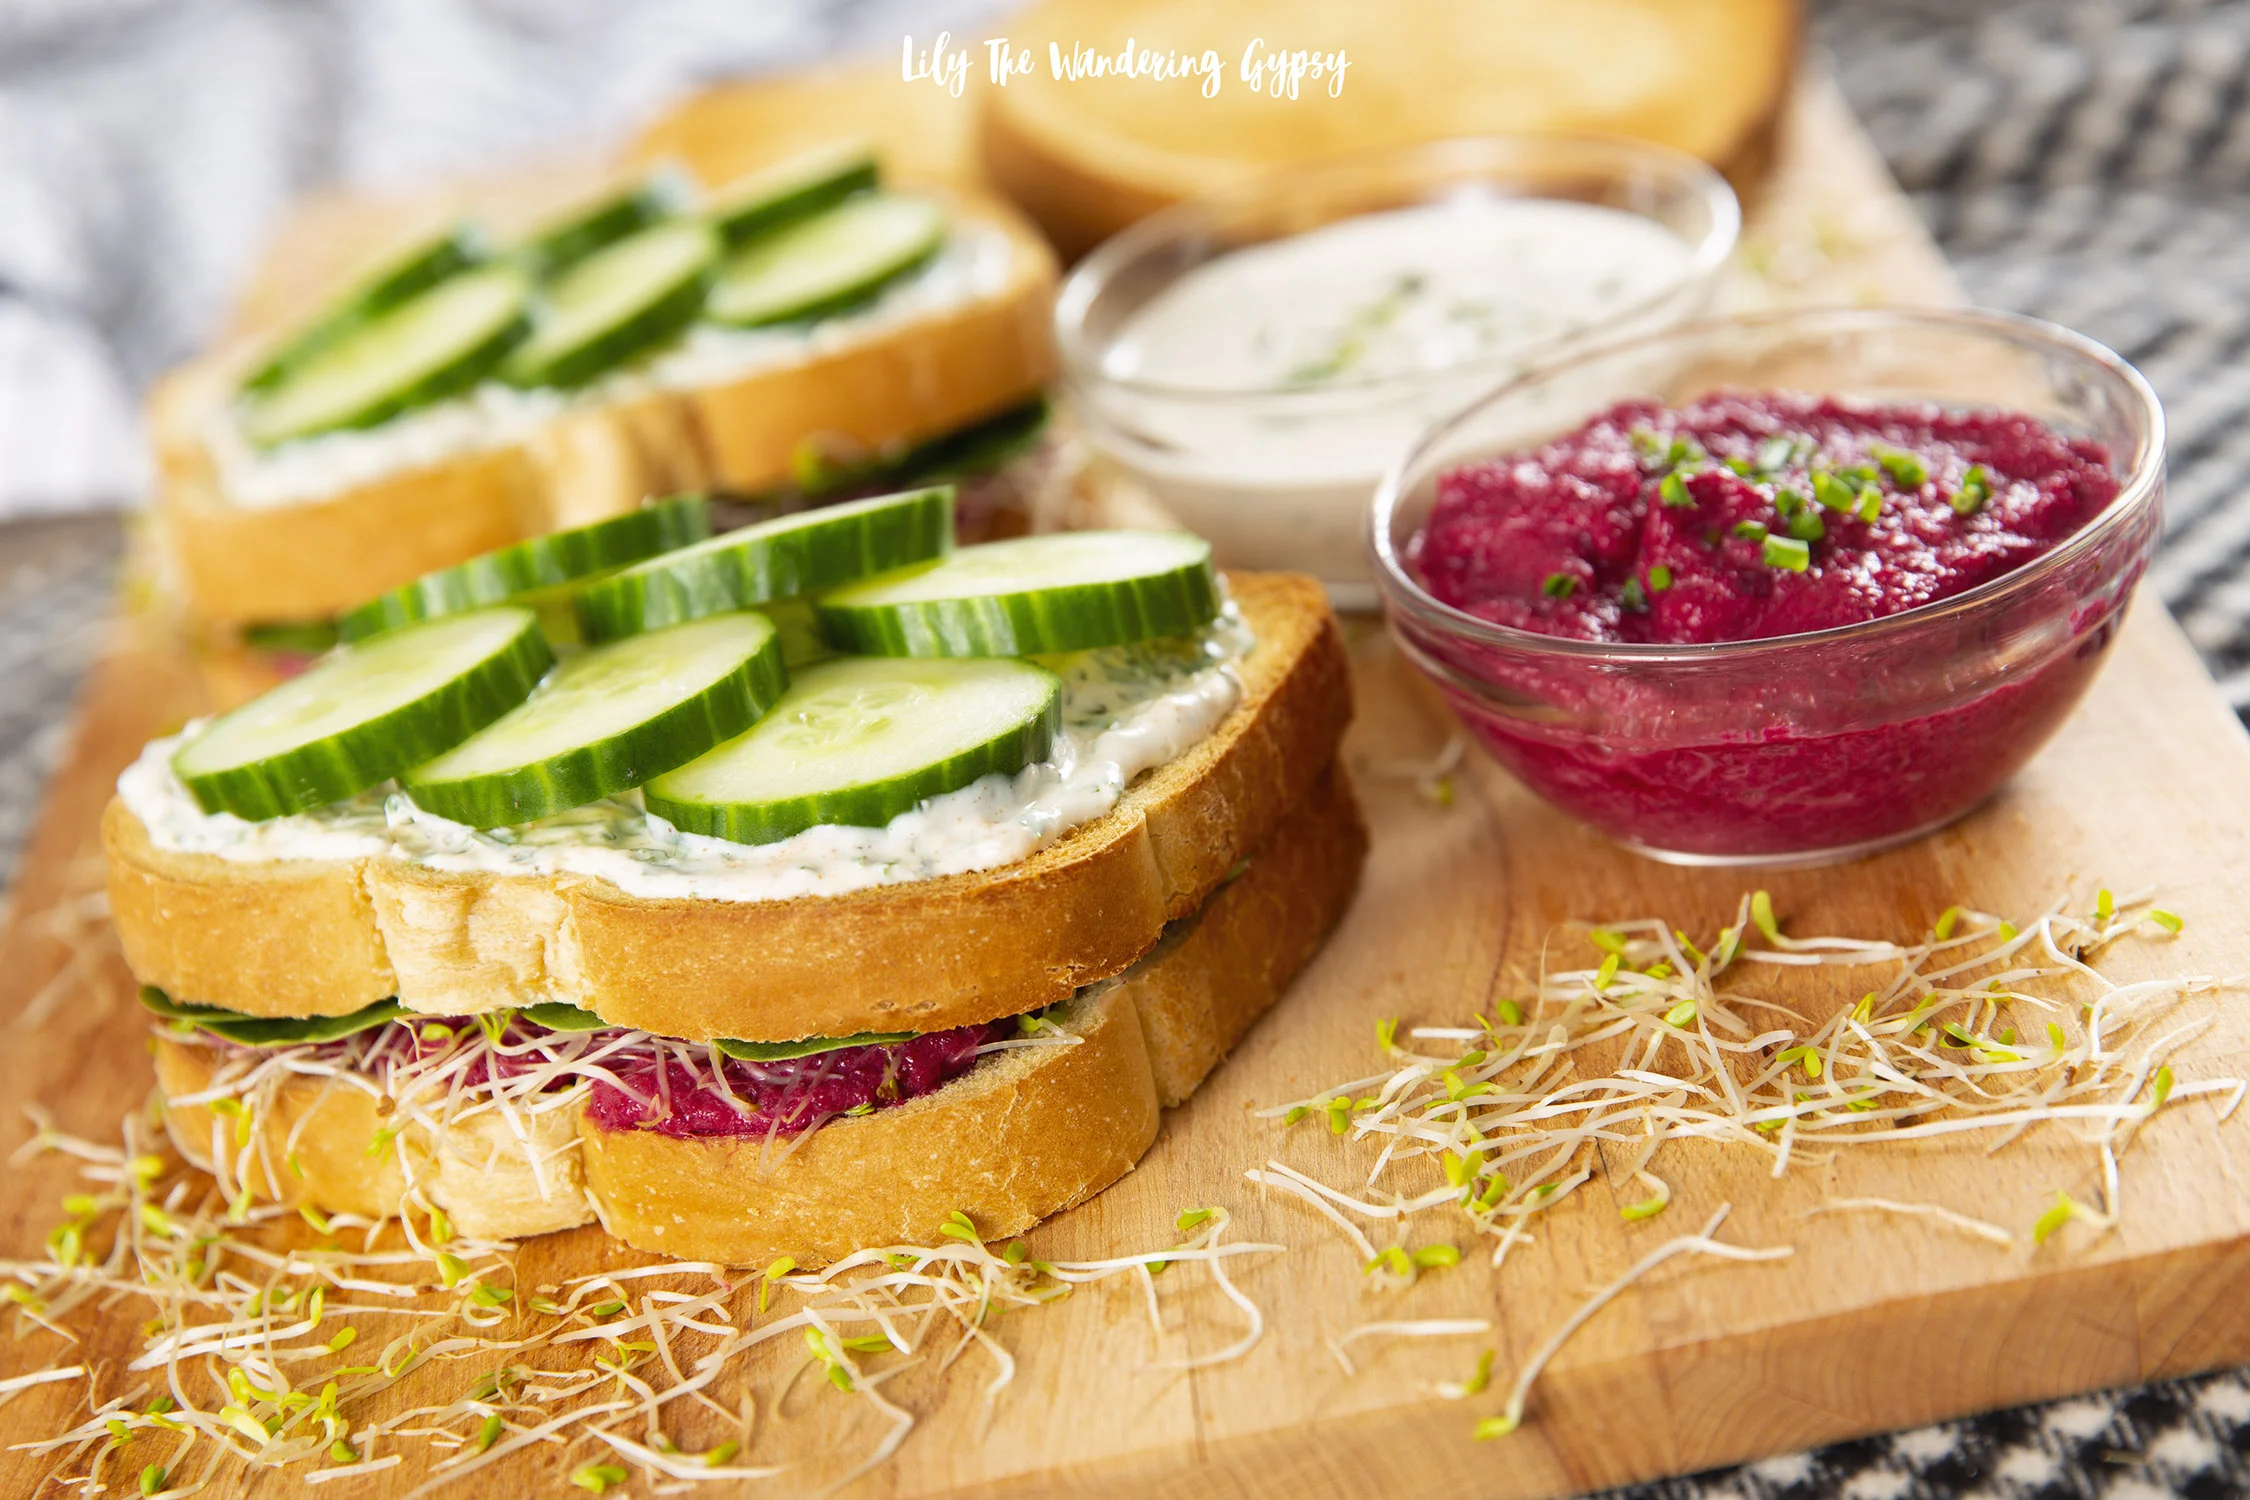
4.) To construct each sandwich – add Beet Spread on one slice of bread, then top with sprouts. On another slice of bread, add Green Goddess Spread and 5 slices of cucumbers (and a bit of salt on top of cucumbers if desired). One piece of bread will remain without any toppings.

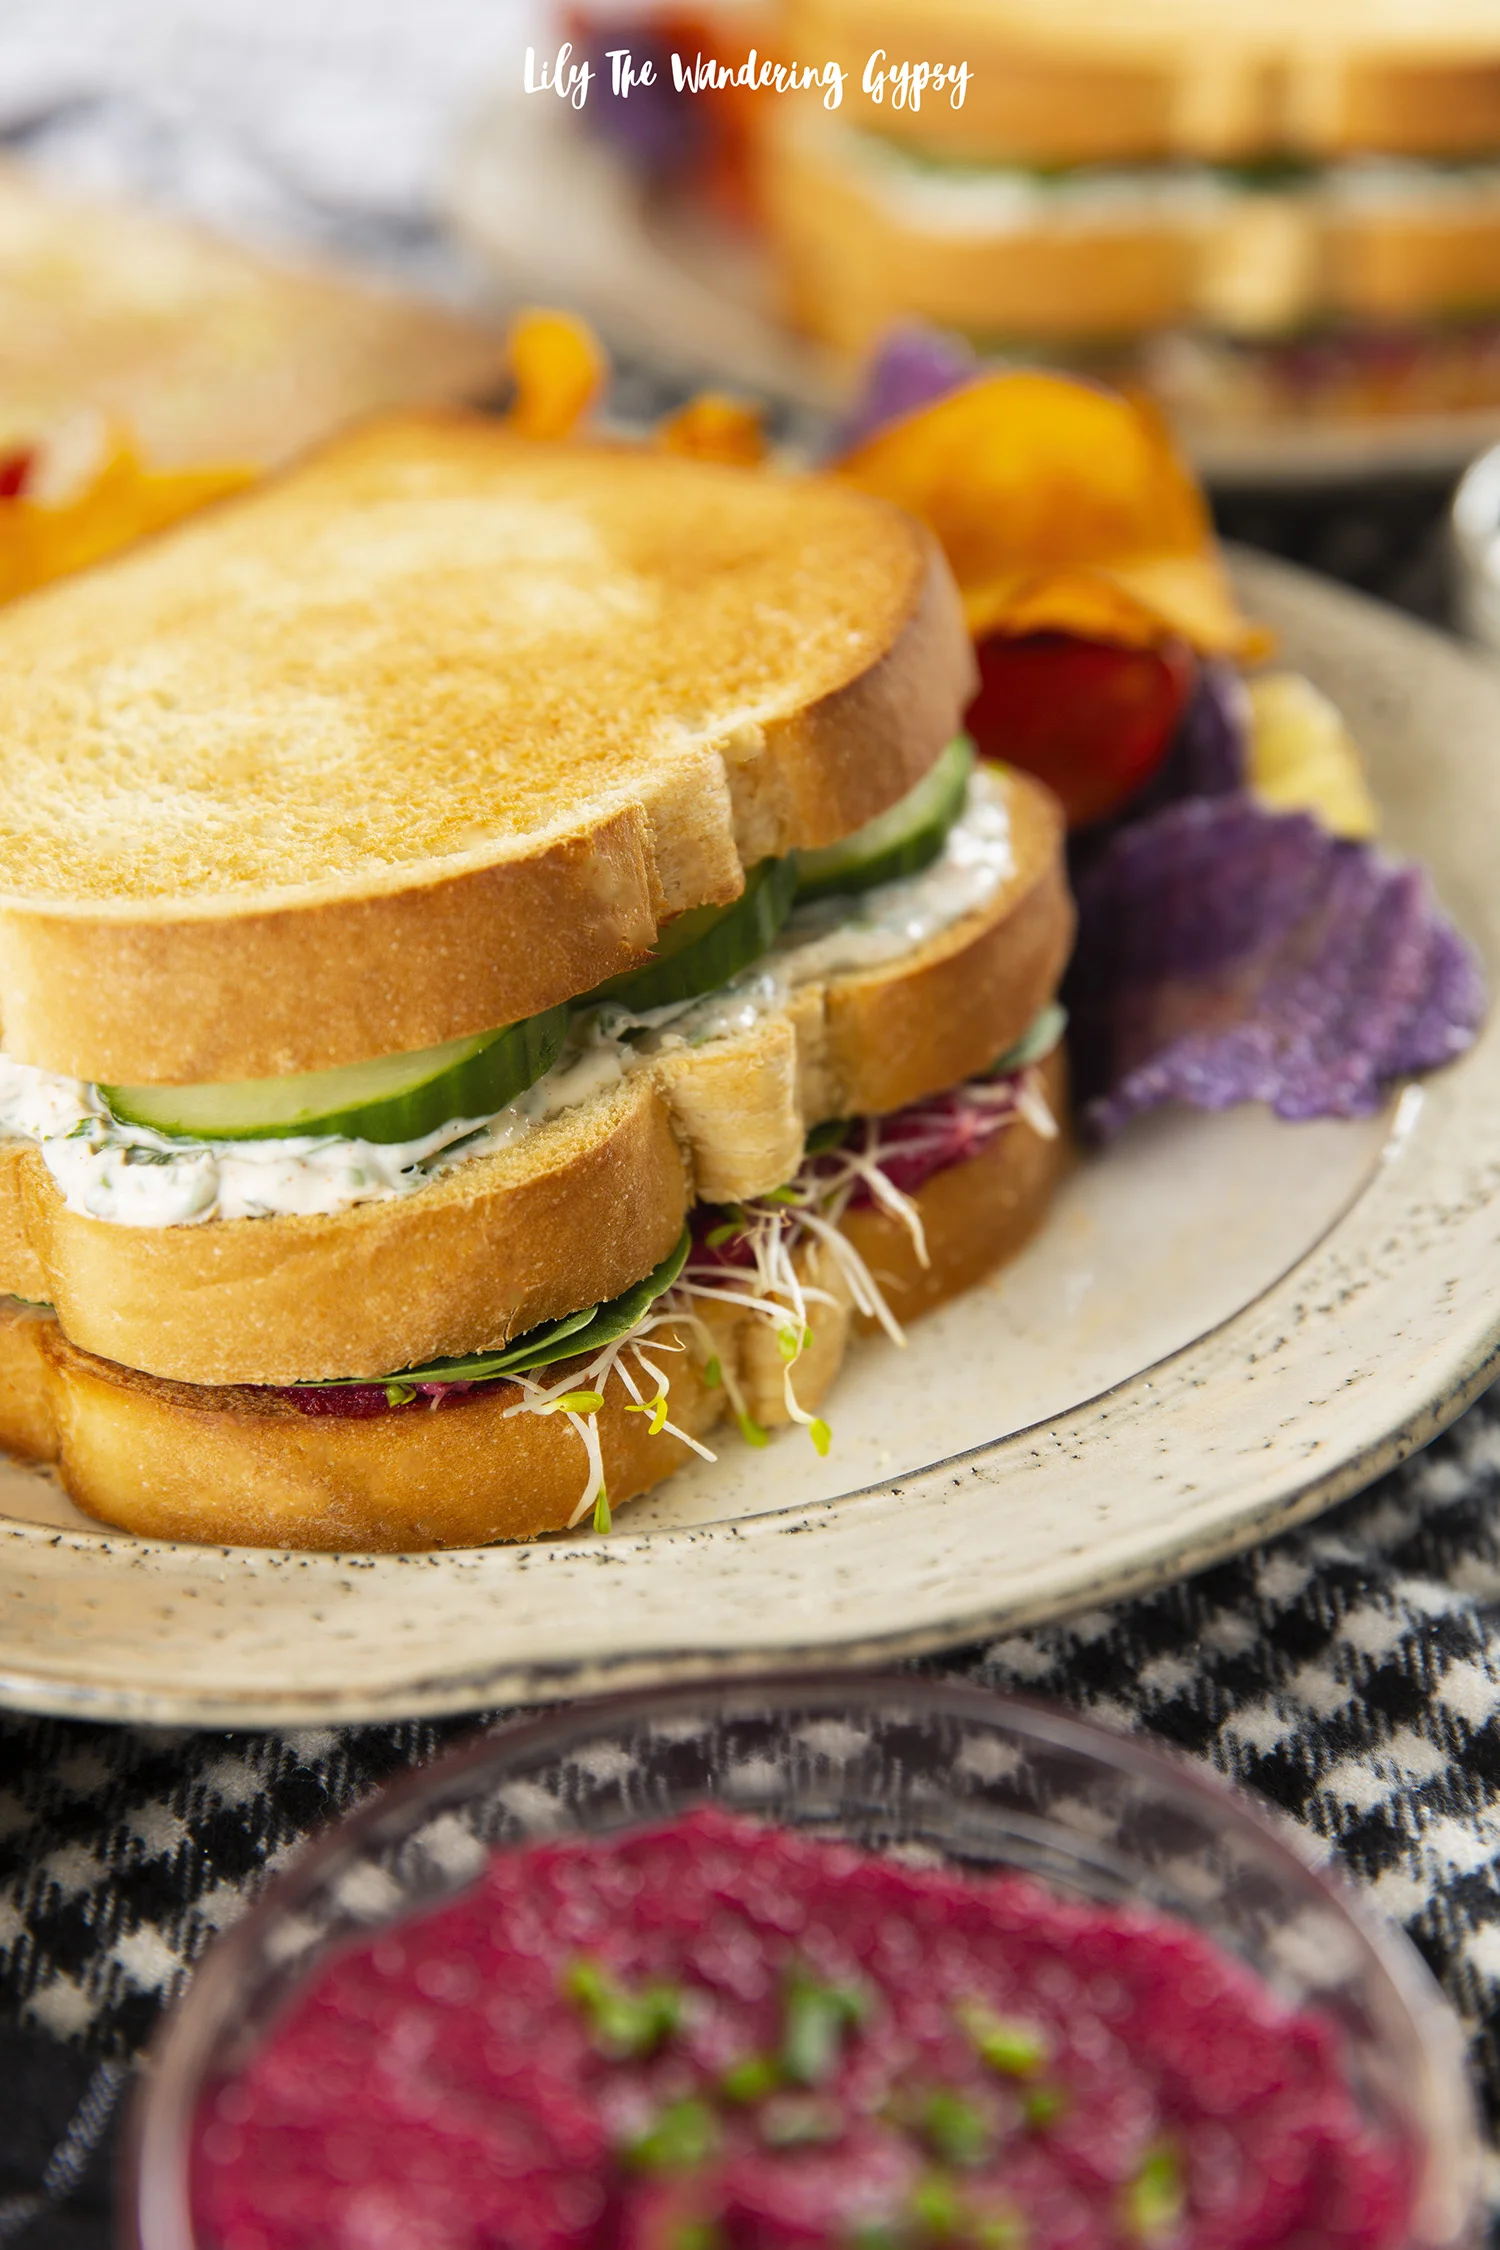
5.) Lastly, layer the pieces like this – Beet Spread + Sprout slice, topped by the Green Goddess and Cucumber slice, then the final top slice of bread, and cut in half to serve! The beautiful layers of bread and ingredients are just so colorful and delicious. This toast also held up very well with all of these ingredients!

I hope you enjoy this vegetarian recipe with those you love! Good food brings people together, and that time with loved ones is what keeps me happy every day! Please let me know if you wind up making this recipe!

Elegant Halloween Party Inspirations

As the weather gets chilly and as we head into the last weekend in September, I am already in Halloween mode! I am doing some research for an upcoming project, and wanted to share my inspirations for an Upscale Halloween Party - decor and tablescapes. I have rounded up some of my FAVORITE and most inspiring Halloween Tablescapes! I generally do tons and tons of hours of research for every project, and realized that I should be sharing some of my inspirations!

First, I am featuring my favorite Halloween project of last year, this super easy to make Halloween Ghost Cake! I used a store-bought sour cream pound cake, iced it, and added Ghost Peeps! It turned out SO well and can be made in under an hour.

Below, this Halloween Mantle incorporates black and gold, and black creepy cloth to really add lots of great texture!

This Halloween Spider Cheese Ball would be amazing to serve with rustic crackers!

As always, Inspired By Charm brings the BEST Halloween decor to life!

Below, Coco Kelly put together this Sirens and Songs Halloween party that featured a bedazzled skull with nods to mermaids and those lost at sea…spooky!

Below, Williams Sanoma offers tips on styling this dark and elegant tablescape for Halloween.

Visit Tendir.com for TONS more inspirations!

Below, I am super inspired by crystals for party decor, and who knows, they might bring some good energy!

Below, in2food uses their famous mirror glaze and topped the cake with an edible gold skull, coconut pieces as geodes, and also a 3D spiderweb! How stunning!

Below, a gorgeous cake by CocoKelley, an all white Halloween Coconut Layer Cake.

And, below are a few more crystals for inspiration! Enjoy :)

Rustic Apple Pie Pizza Recipe + Why I love Fall Baking

This is a sponsored post written by me on behalf of Oregon Chai®. The opinions and text are all mine. #OregonChaiMeTime 

Wow! Have I got an incredible recipe for you today. It embodies the fall spirit, and includes a dessert “pizza!” This delicious and unique recipe is rustic, sweet, and crunchy; an amazing pairing with a nice, warm Oregon Chai® Tea Latte! Make this amazing dessert for your next gathering, dinner with friends and family, or even for a potluck. This dessert will vanish before you know it.

To me, baking is one of the best ways to spend “me time.” I tend to find myself baking the most once the weather cools down, when I have a bit of free time, or even when too many days have passed since I created something delicious.  Any day that includes chai tea and some me time is a GOOD DAY!

I wasn’t always able to bake freely though. Before we got our new furnace this summer, the house would get WAY too hot (83 degrees +) when I turned on the oven, and so it was nearly impossible to justify baking when the house would not cool down from it. I made so many no-bake meals, or even used our awesome toaster oven to try to make complete meals, small casseroles, and even side dishes – baking cookies, pies, or brownies really doesn’t go well in the toaster oven.

I didn’t even realize how strong of a connection I had to baking, until I had limited use of the oven, and realized how sad I was when I looked through Pinterest and saw all of those recipes that I could not even attempt. I now bake every few days (or more) and I am so happy about how cool our house stays finally. Thank goodness for good air conditioning, LOL!

I also tend to LOVE sweet desserts and dishes, so this one is just perfect for me. If you like desserts that are on the more savory or less sweet side of life, then you can majorly reduce the amount of sugar I have suggested. Either way, you’re going to love this apple pie pizza.

Pizza is such a familiar comfort food, and when I had a slice of this Apple Pie Pizza, it took me back to eating some of the best thin crust pizza ever, combined with one of my favorite fall desserts ever.

Since we are surrounded by apple orchards here in southern Illinois, using apples in my recipe came as a very natural solution to eating more local ingredients!

This rustic recipe is crunchy around the edges from this crispy crunchy dough, sweet, tart from the apples, buttery from the dough, and the egg wash and cinnamon sugar topping makes the most excellent crunch when you bite into it.

Perfect for enjoying on a chilly fall day or evening! I was extremely happy with how this recipe turned out, and I know you will be too. I used an organic pie crust from the store, and it held the shape of the lattice just perfectly.

By cutting the lattice into smaller, ½” strips, I was able to make a very intricate pattern on top of this Apple Pie Pizza. Feel free to also cut the strips into 1” pieces to make life much easier! The ½” strips were not incredibly hard to work with, just a little more time consuming. But, patience always pays off when you’re baking.

RECIPE

INGREDIENTS:

1 package refrigerated pie crust (2 per package)

2 apples, I used green apples

4-5 Tbsp.  sugar

1 tsp. cinnamon

1/8 tsp. nutmeg

1 egg, whisked for egg wash

4-6 Tbsp. water in a small bowl to use to attach pie dough together

Round or Rectangular baking sheet

Parchment paper

Oregon Chai Tea Latte Concentrate to enjoy while baking!


INSTRUCTIONS:

1.) Chop 2 apples into tiny pieces and coat with 1 ½ - 2 Tbsp. sugar, ½ tsp. cinnamon, and 1/8 tsp. nutmeg.

2.) Unroll both pie crusts onto a work surface covered in parchment paper. Optional: use a rolling pin to smooth out any creases.

3.) Use a ruler to mark every ½” or 1” on one pie crust. Also, use the ruler and a sharp knife to impress even lines and cut strips from the pie crust. Set aside.

4.) Spread an even layer of apples onto the other pie crust.

5.) Weave dough strips over apples, first laying half of the strips vertically, then weaving the horizontal pieces in next. Feel free to use a little bit of water in each place where the dough strips overlap. Brush top crust with egg wash.

6.) Once done weaving, sprinkle on a mixture of 2 Tbsp. sugar + ½ tsp cinnamon, and bake for 15-20 minutes at 375 degrees F. Slice like a pizza and enjoy! We cut the finished Apple Pie Pizza with a sharp knife, but you could also use a pizza cutter!

Make sure to also grab your Ibotta offer here for 75 cents off any 1 Oregon Chai product at Walmart (9/26/18 – 11/30/18, or until supplies last).

Stock up now! This tea is so delicious you will want to incorporate it into your every day routines and serve it to anyone who visits you.

I was able to easily order the Oregon Chai Tea Latte Concentrate (32 oz.) on Walmart.com using their super easy Online Grocery Pickup service!

Below, you will see how easy it was to search for all of the available Oregon Chai products at Walmart. I spent around $12 to create this entire recipe, and since the Chai Tea was under $4.00 I saved SO much compared to going to a coffee shop for an overpriced drink.

After I went to the checkout page, I simply chose “Pickup” for FREE (see below)! No shipping charges at all, which saved me around $6.00. YAY!! I love a good deal.

The taste of this Oregon Chai Tea was rich, smooth, and has those amazing chai spices that I can’t get enough of. I like to add macadamia milk to my chai tea, instead of traditional dairy milk, and my body loves me for it! What a delicious way to get a little pick-me-up during baking or during any other time of the day.

Once my order was ready, I was able to run by my local Walmart and easily grab the tea in the pickup area. Super easy since I had so many errands to run that day.

Has your local Walmart installed an Online Grocery Pickup station yet? Ours JUST remodeled, and I had an extremely easy experience, let me walk you through it/ 

1.) Visit the Walmart Online Grocery Pickup station and scan the barcode given in your email.

You can also just wait outside and call the phone number on the pickup area. They will bring everything right out to you!

Like I said, baking helps me de-stress and helps me continue to be creative, so after getting a ton of things checked off the to-do list, I relaxed for a bit, then got to baking.

I hope you have an absolutely splendid fall, and please comment below to let me know if you tried making this recipe! This would be so fun with kids, and would be a fun holiday baking activity. Enjoy!

Easy Caramel Brownie Layer Cake

If you are a fan of layers upon layers of chocolate brownies, homemade whipped cream, and caramel, then this is definitely the cake for you! Although it looks so elegant, it really is pretty easy. This dessert allows us to think beyond the traditional chocolate cake, and make your next dessert rich, decadent, and delicious! When I made this dessert for a potluck, people raved about it. It was so delicious once the whipped cream layers sat with the brownie layers, because the sides stay a bit crunchy, and the inside portion of the cake moisten up and form more of a fudgy and cake-like consistency all at the same time, that’s out of this world! Hope you enjoy.

INGREDIENTS:

*Note - Amazon Affiliate Links have been provided if available

For The Whipped Cream:

For The Brownies:

  • 2 boxes of brownie mix (I used Ghirardelli caramel turtle brownie mix, and instead of mixing the caramel into the brownies to bake, I decorated the top pf the cake with it!)

  • Brownie ingredients (eggs, oil, and water)

  • 3 round baking sheets - I found mine for about $1 each at Walmart!

  • Caramel Sauce if not included in Brownie boxes you use.

INSTRUCTIONS:

1.) Preheat oven to 375 degrees. On parchment paper, trace your circular baking dish three times. Cut those three paper circles out and set aside. Spray three circular baking pans with Pam, then place the circular paper pieces into the baking pans and spray a little bit more to coat paper.

2.) Mix up 2 boxes of your favorite brownie mix and pour into three prepared circular baking pans. Bake the three circle pans for 15-20 minutes, check to see if they are done by inserting a toothpick to see if they are done.

3.) To make your homemade whipped cream, in a stand mixer, add 1 pint of heavy whipping cream + 1/3-1/2 C. sugar + 1-2tsp vanilla. I also love using vanilla bean powder to add little black flecks and more vanilla flavor to my whipped cream. Whip for 2-4 minutes on high, until stiff peaks form. Just keep mixing, it may seem like an eternity, but is so worth it! Do not over beat the cream, or it will begin to resemble butter, and not be very fluffy.

4.) Now, it’s time to “layer up”! I have shown all of my layering steps below, so you basically layer up: brownies and whipped cream until you get to the top layer. Make sure to make the top layer of whipped cream as smooth as possible. But, no need to stress about being perfect - this cake is a naked cake and is pretty rustic anyway, so the more homemade it looks, the better!

5.) To decorate the top: I used caramel sauce in a squeeze tube that worked perfectly to decorate. I basically just made a continuous line of caramel vertically across the entire cake, then crossed that again with caramel lines horizontally. I rotated the cake as I worked, which was great. Add sprinkles and enjoy!

THIS CAKE ROCKS! HOPE YOU ENJOY!

If you wind up making this recipe or any other recipes, please tag me on Instagram with @happysolez! Thanks!!

2 Ingredient Fall Apple Dip Recipe

Yum! Fall is right around the corner and I have an amazing recipe for you! Everyone loves this amazing dessert, and I know you will too. My al time favorite Fall flavor would have to be caramel apple. The mix of those sweet tart green apples meld so perfectly with the salted caramel sauce and the tangy bite of the cream cheese adds an upscale flavor to this dish, which I hope you enjoy!

INGREDIENTS:

1 (8 oz.) Block of Cream Cheese

1/3 - 1/2 of a jar of salted caramel sauce (we love the Smucker's Simple Delight Salted Caramel)

2-3 apples, sliced (we used green and red, any flavor will do!)

INSTRUCTIONS:

1.) Open the block of cream cheese, and place it onto a plate, and pour LOTS of caramel over the top of the cream cheese.

2.) Chop apples and place beside dip. Enjoy!