New Year's Eve Celebration In Black and Gold

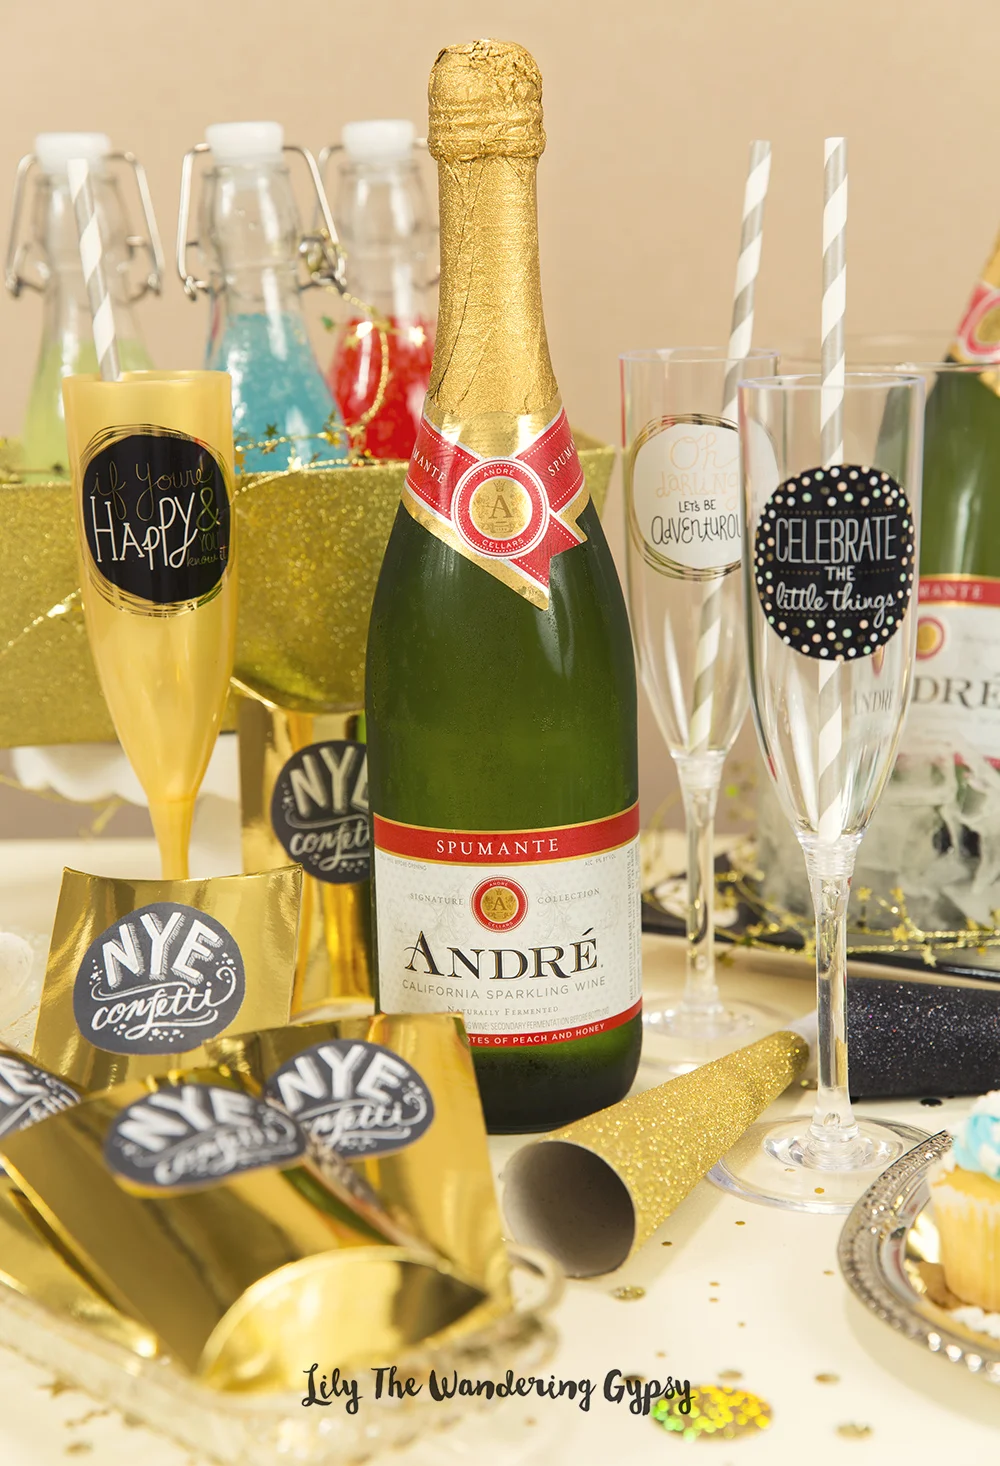
I hope everyone is having a safe and wonderful New Year's Eve! I love the combo of black and gold, and use those two colors together any chance I get. They are so pleasing to my eyes, that I created a Pinterest Board a while back called "Black and Gold"! 

NYE
NYE!

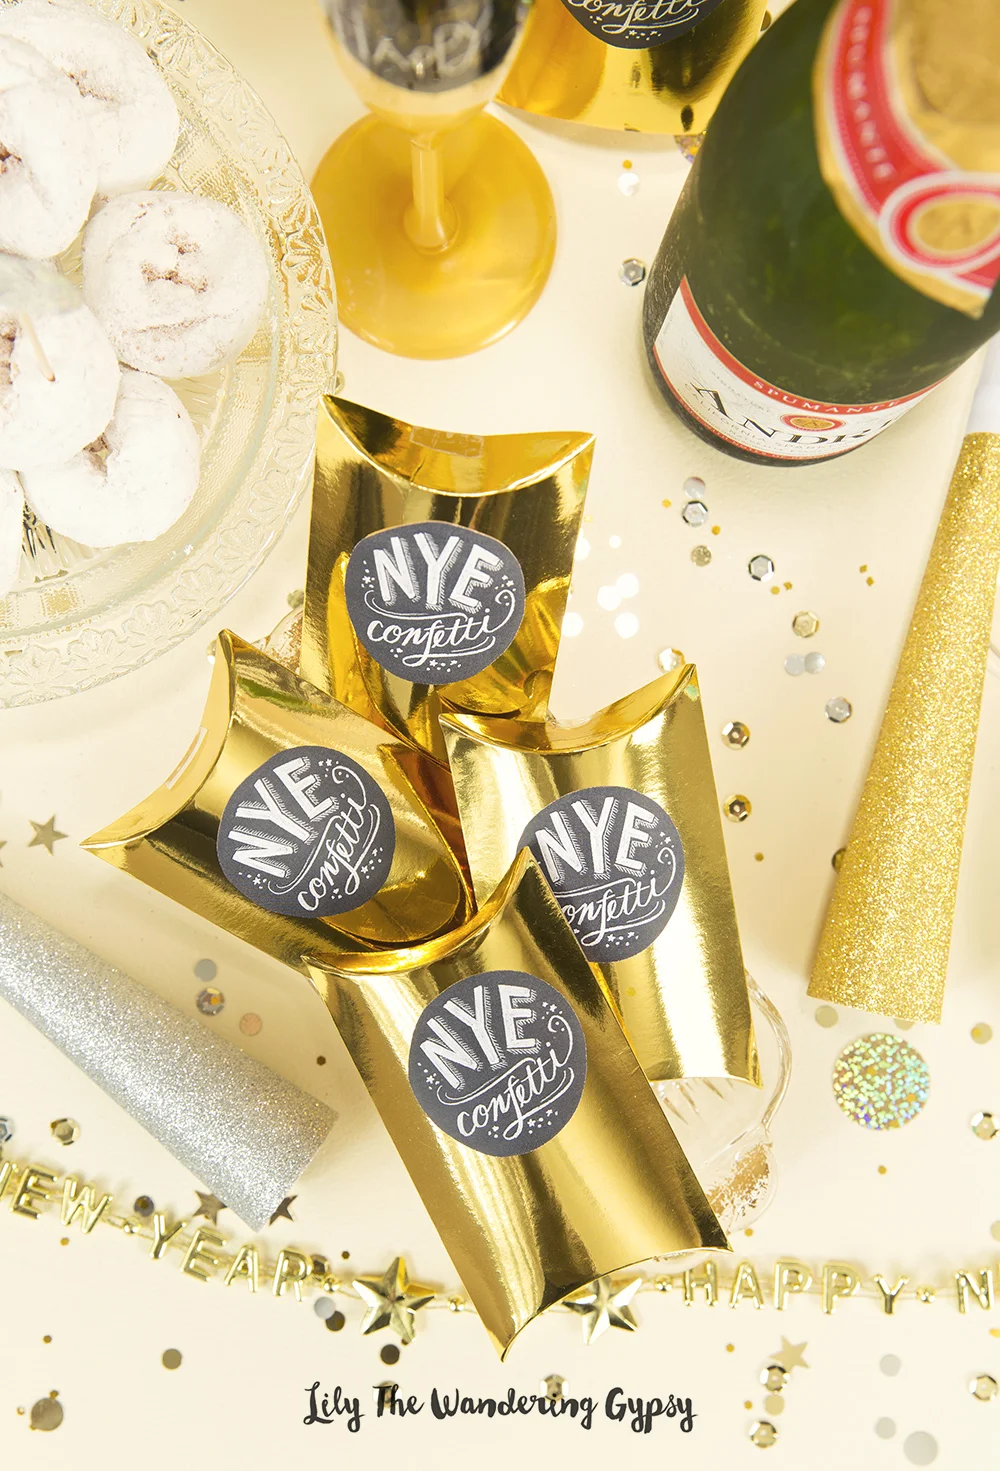
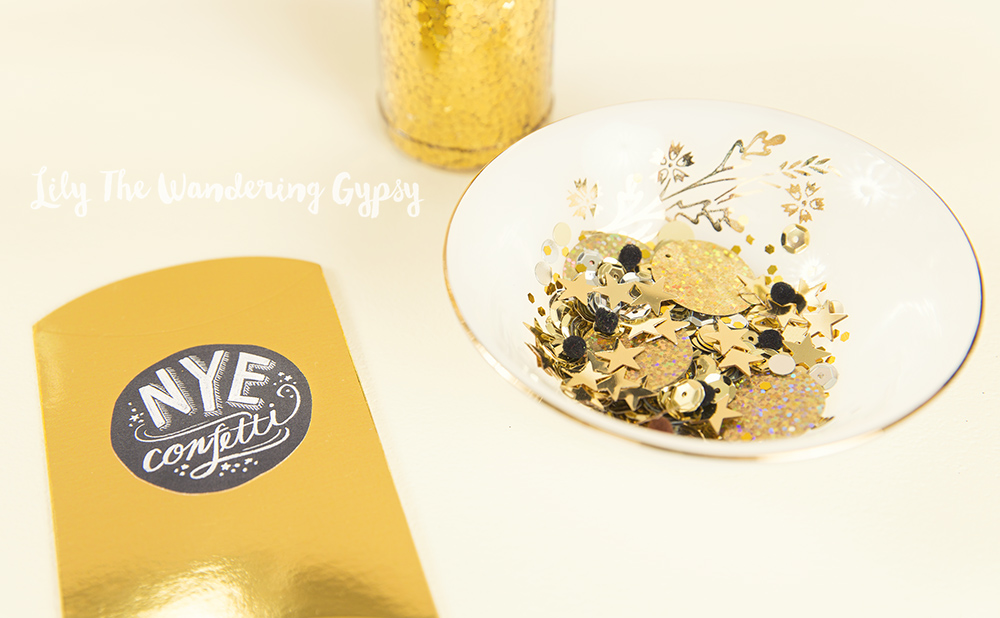
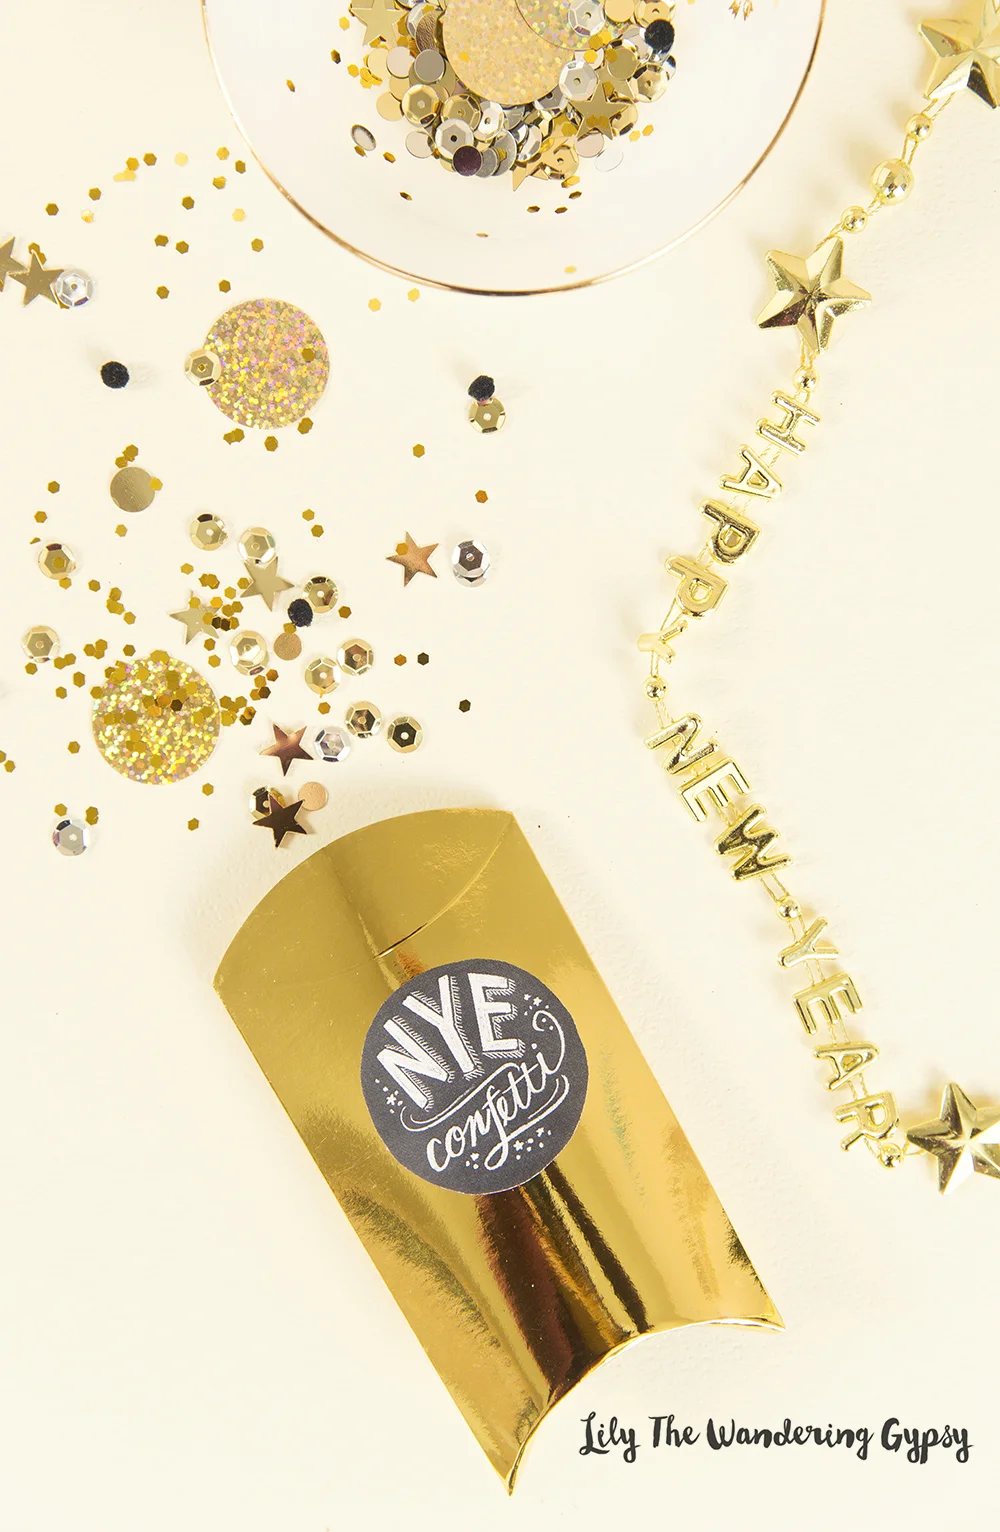
And a fun DIY for you! Check out these super easy Confetti Envelopes! I created them with some things I already had on hand, and printed these adorable little NYE Confetti Circles from this blog, HERE. 

DIY Confetti Pillows
NYE

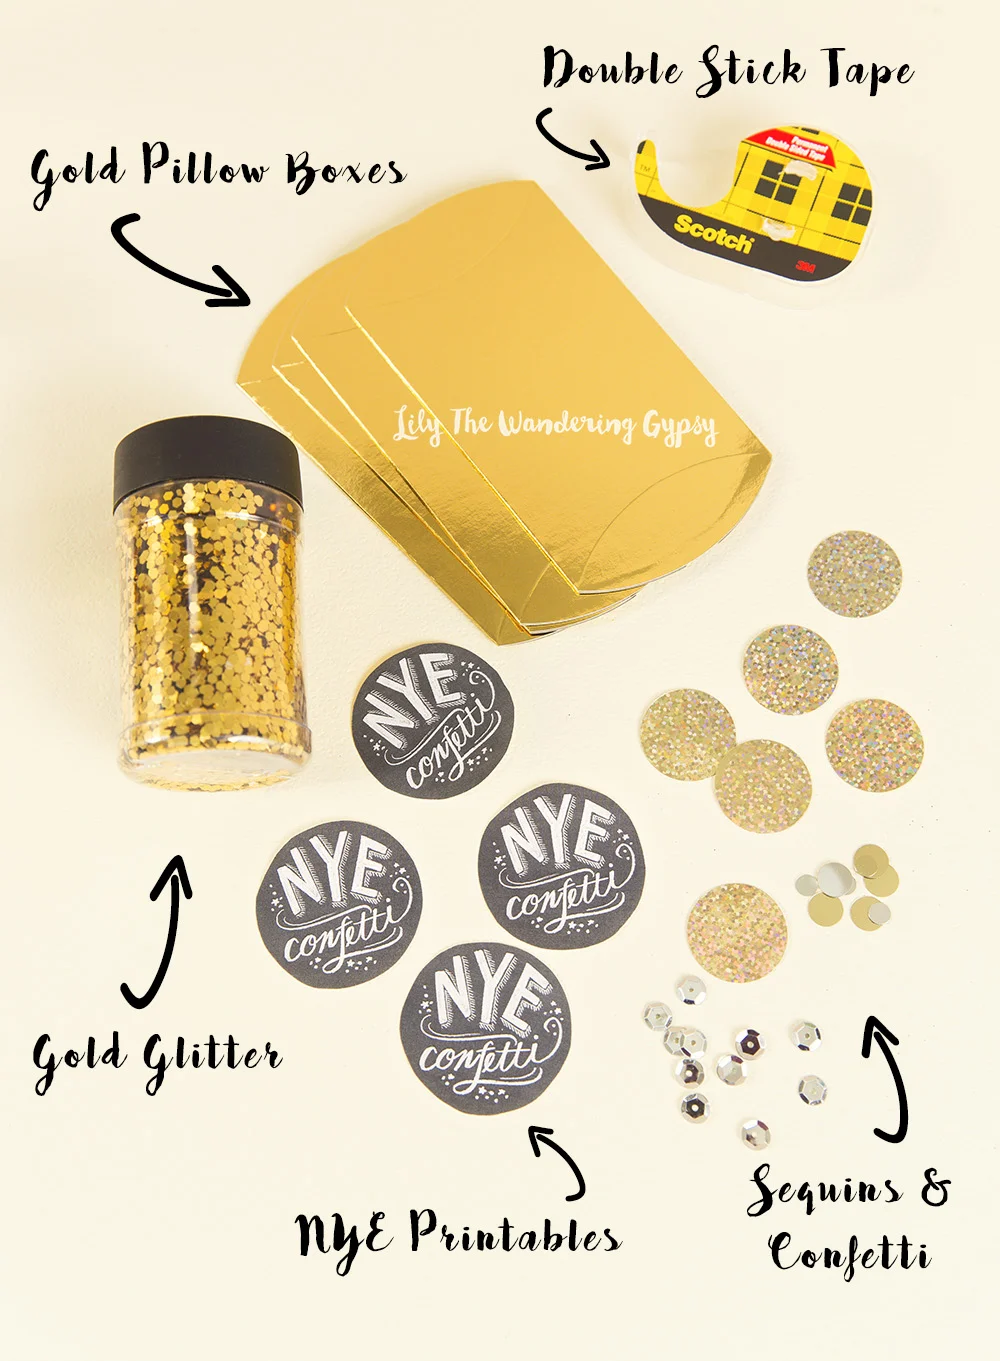
Simply cut out the NYE circles, and affix them to the gold pillow boxes with double sided tape. Then, mix up a bunch of glitter, sequins, gold stars, and/or other pre-made confetti in hues of gold and silver. Basically anything that shimmers could go into these. Love the look of all that shine!

NYE
NYE
NYE
NYE
NYE
NYE
DIY Champagne Flutes
NYE
NYE

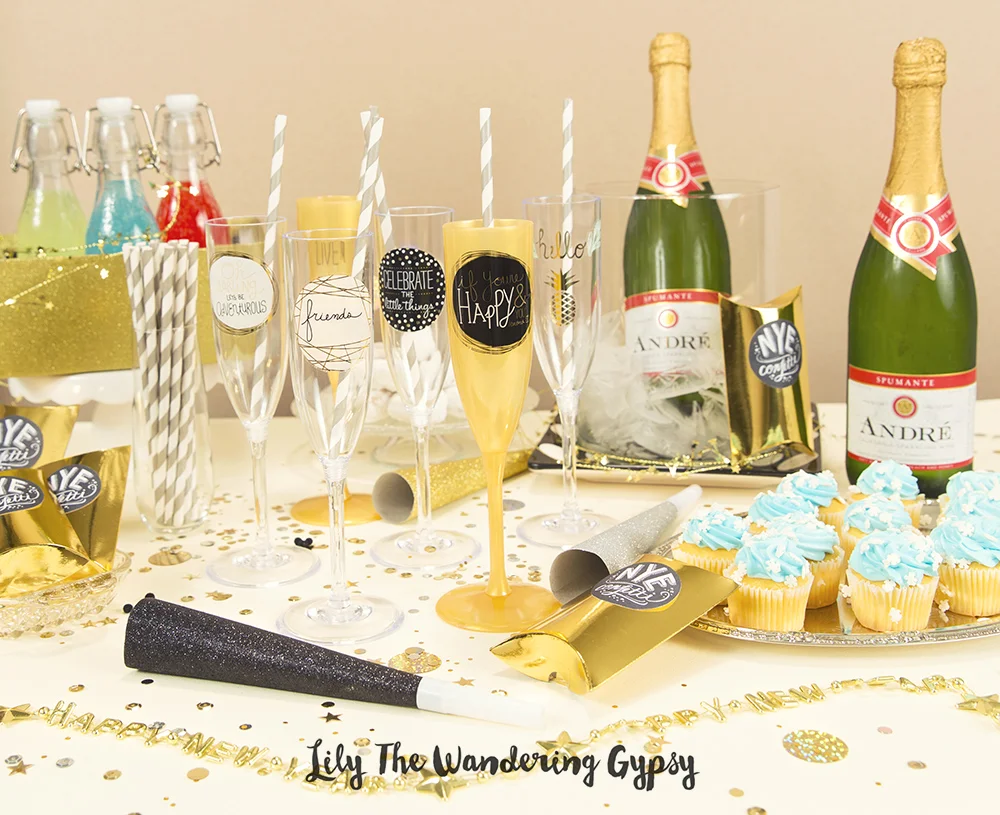
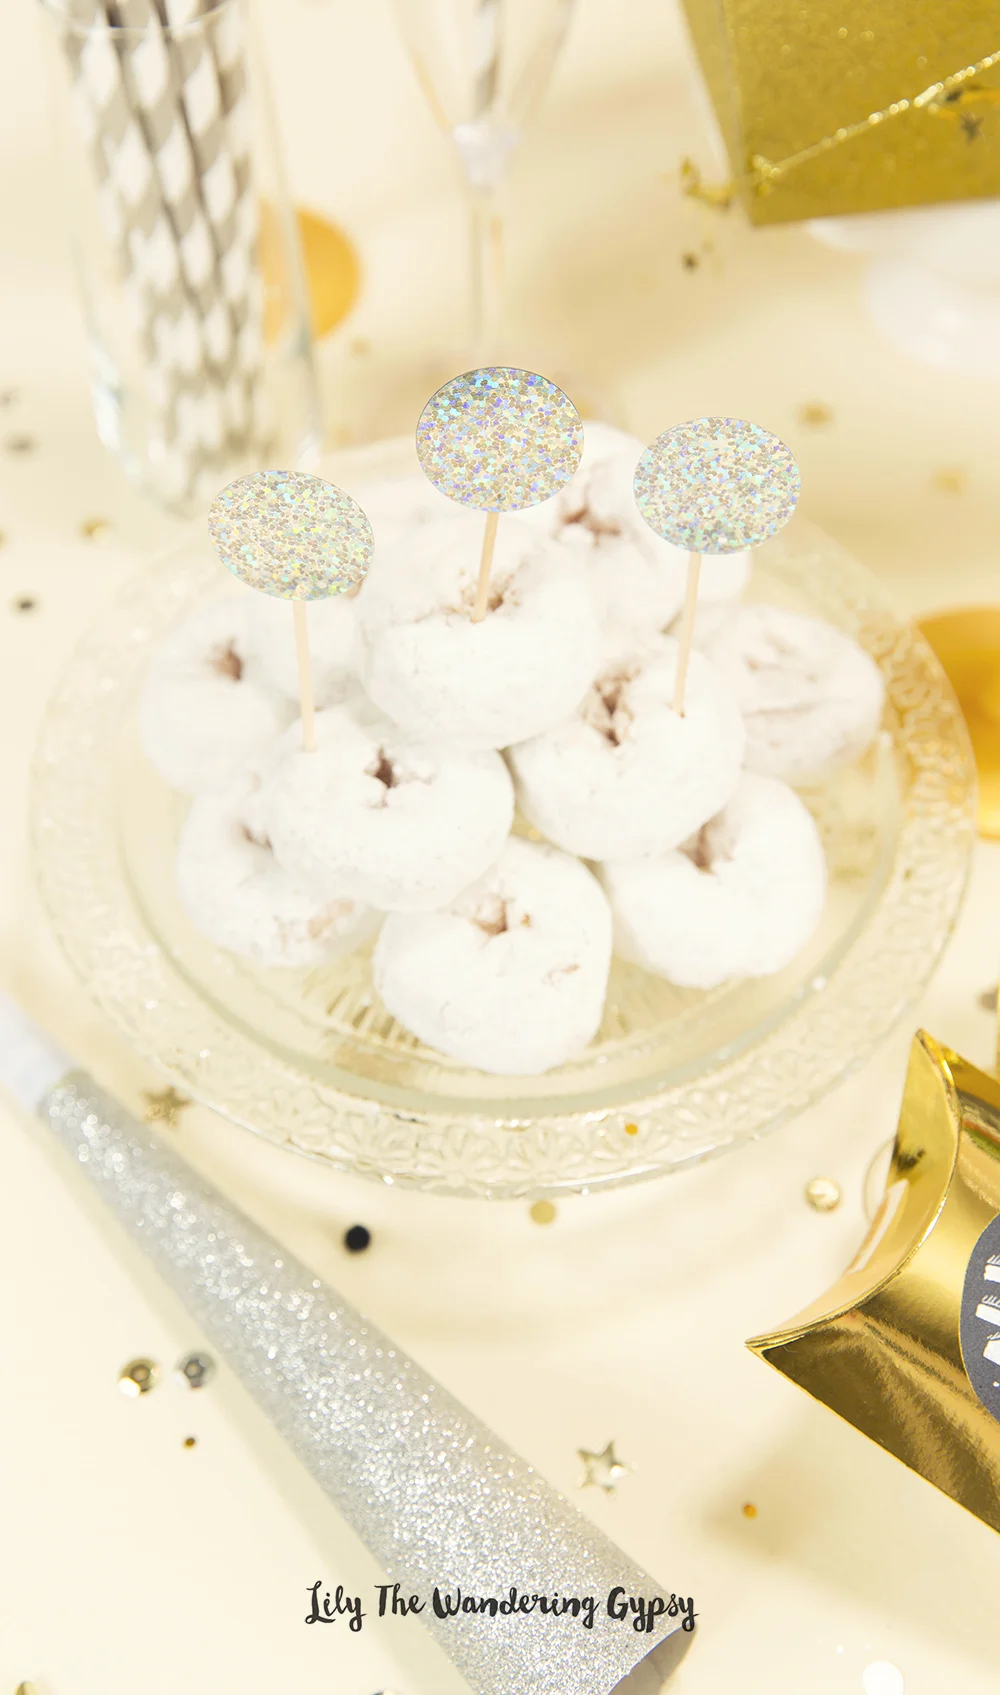
And, below, I created these cute little donut toppers by glueing some larger confetti pieces to toothpicks with Tacky Glue. Can;t wait to try this out on a larger scale with cupcakes soon!! 

NYE
NYE

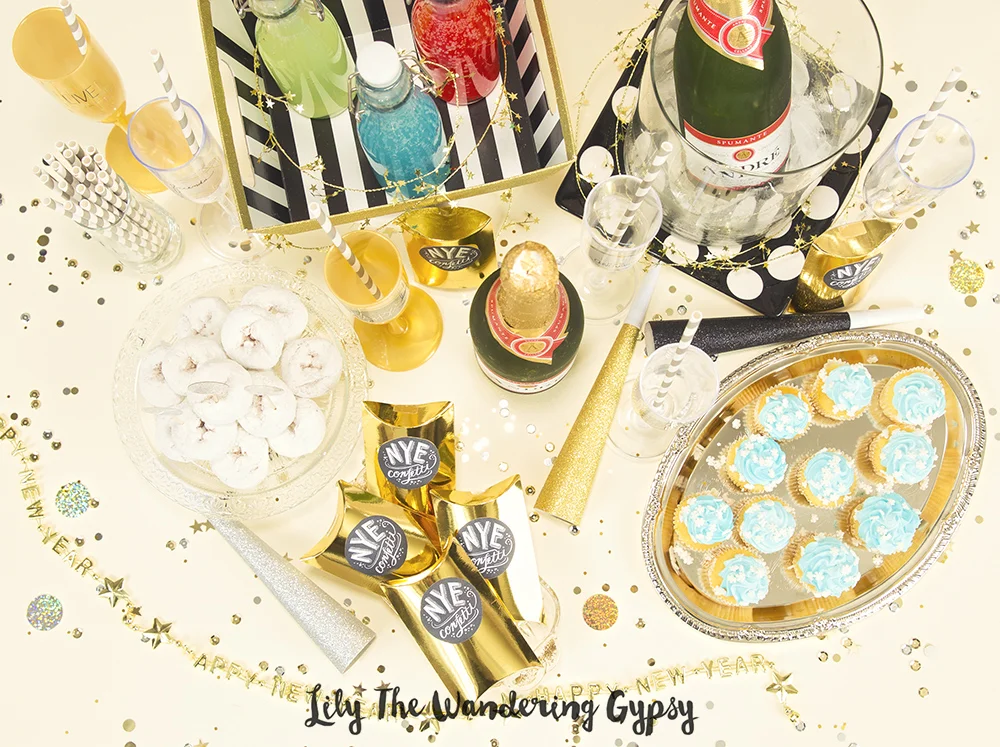
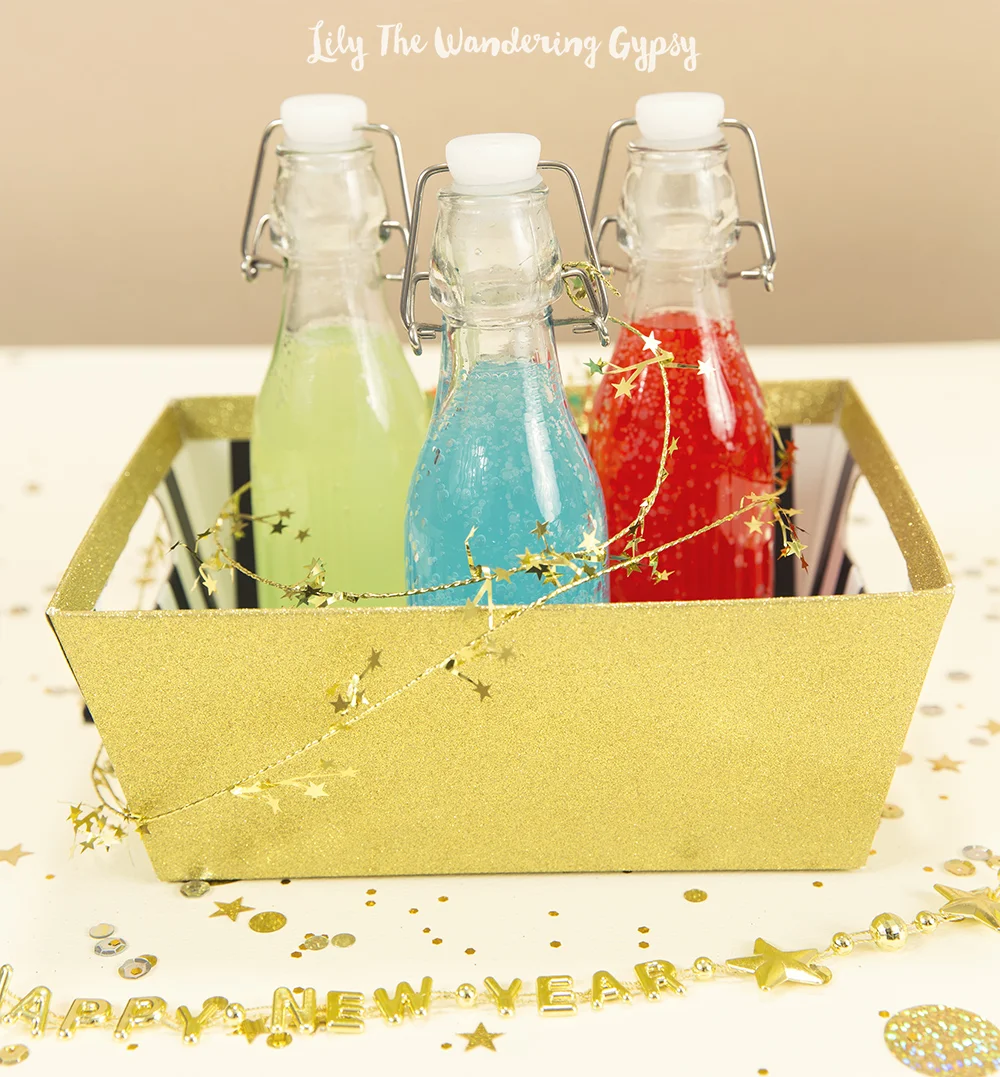
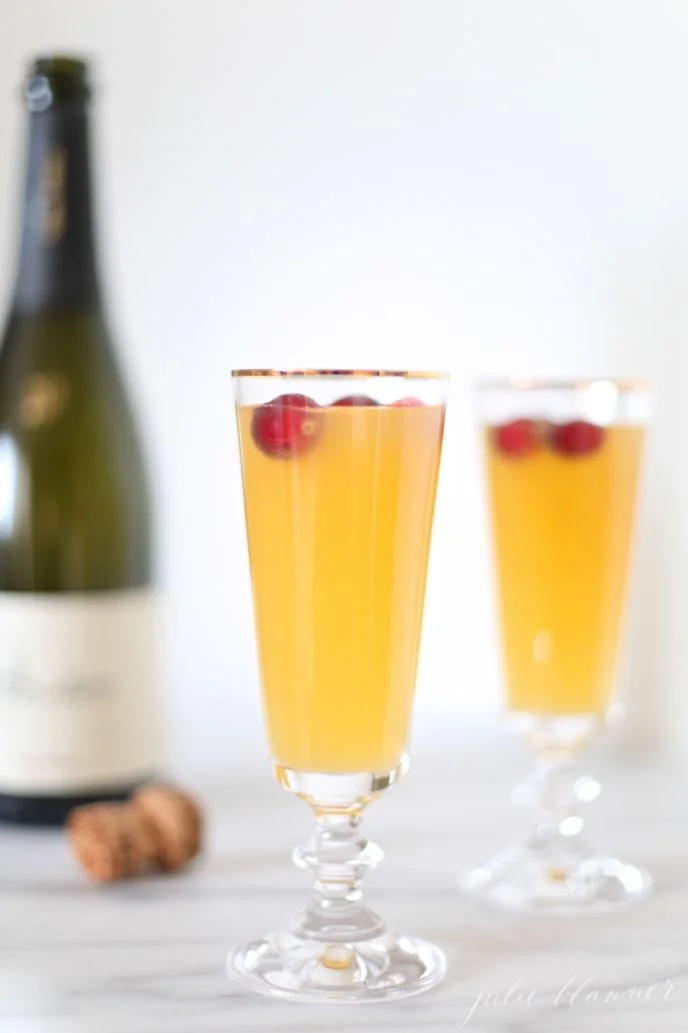
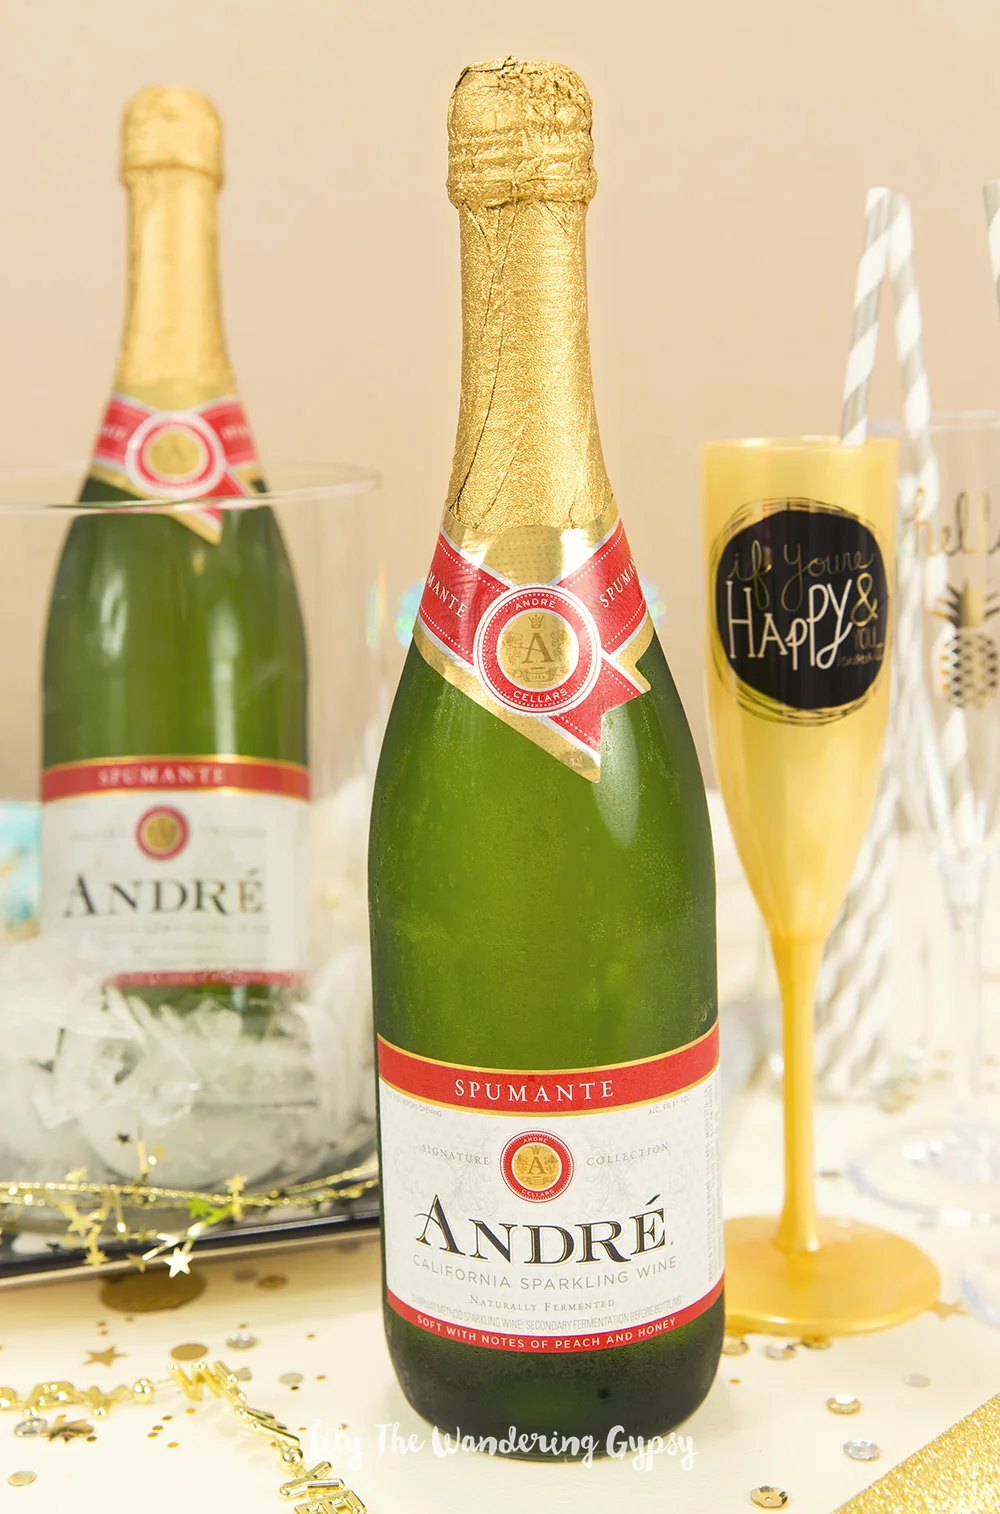
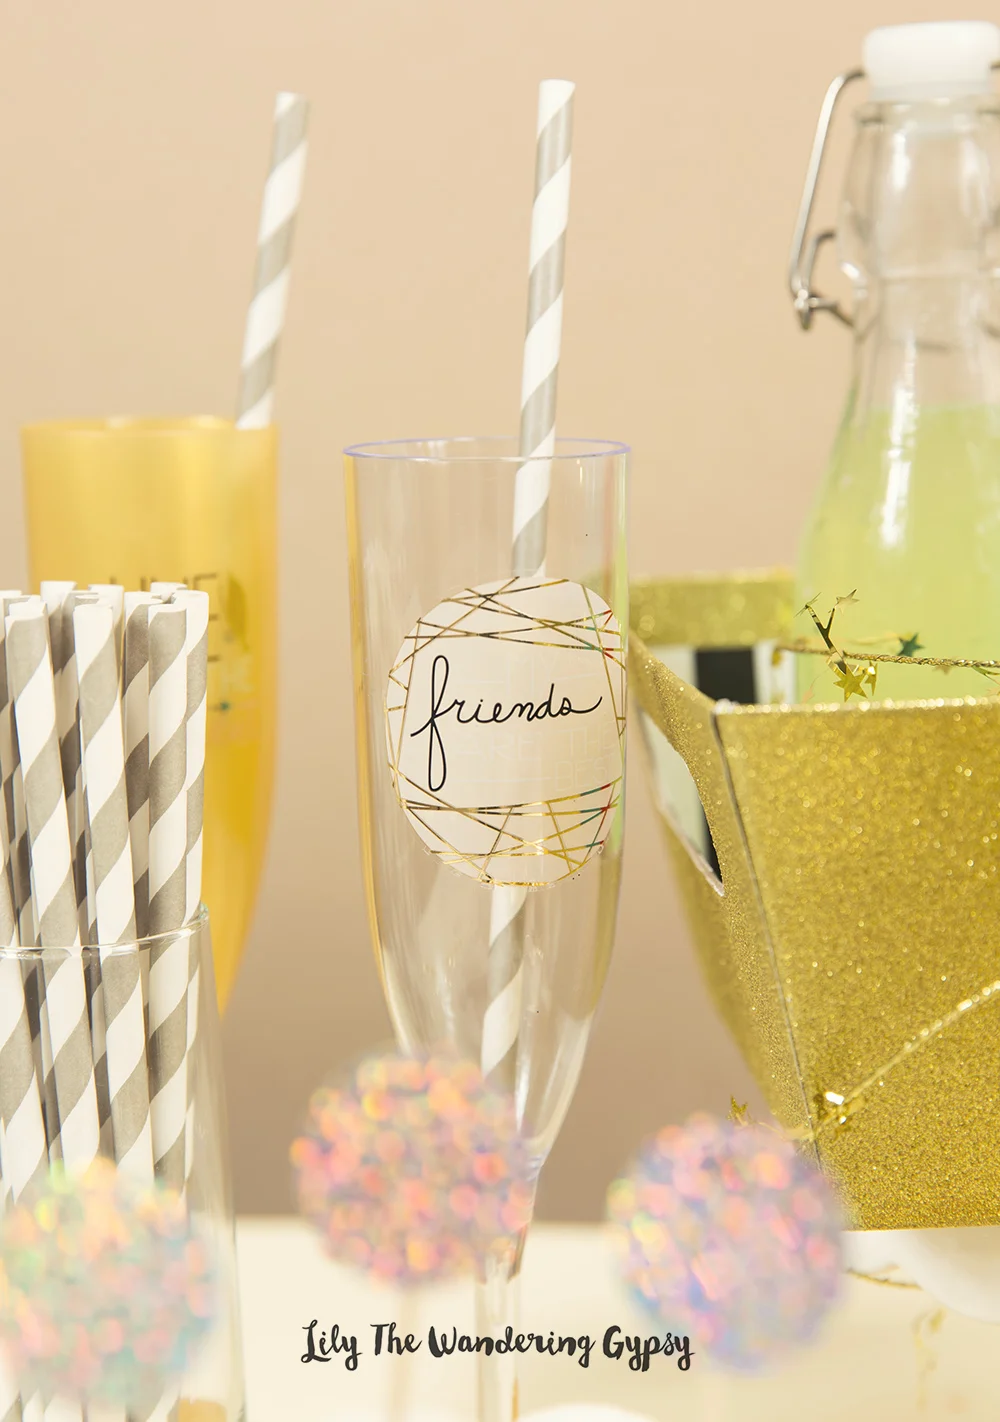
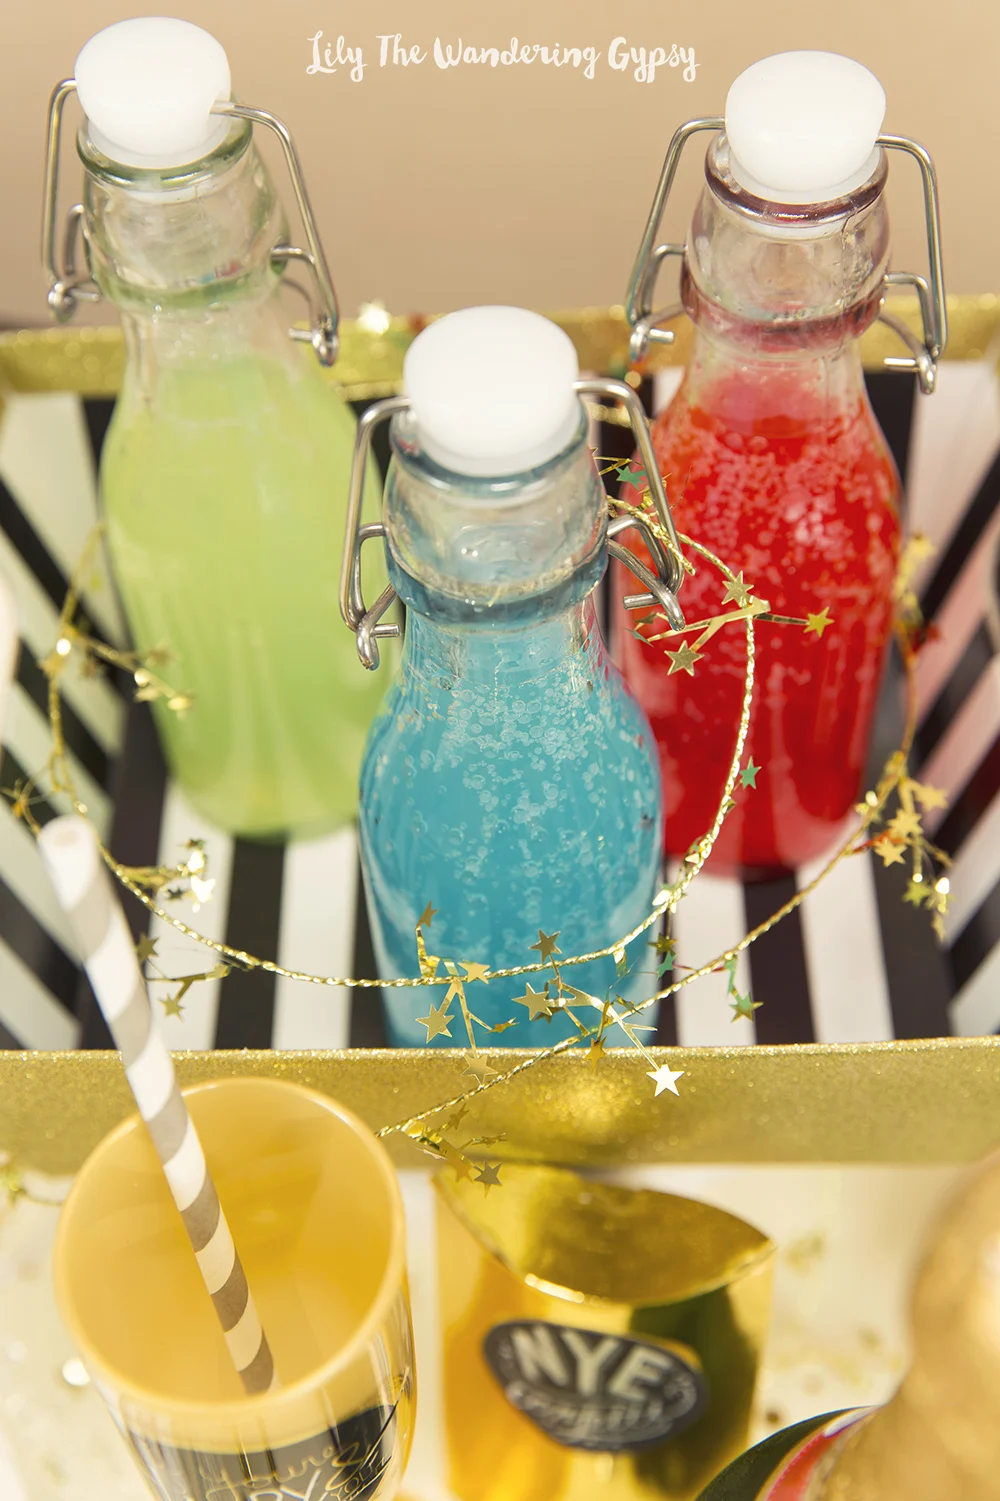
I thought it would be so great to have some different flavor options. Just choose 3 of your favorite flavored juices, and allow guests to choose what juice to add to their sparkling wine.

NYE

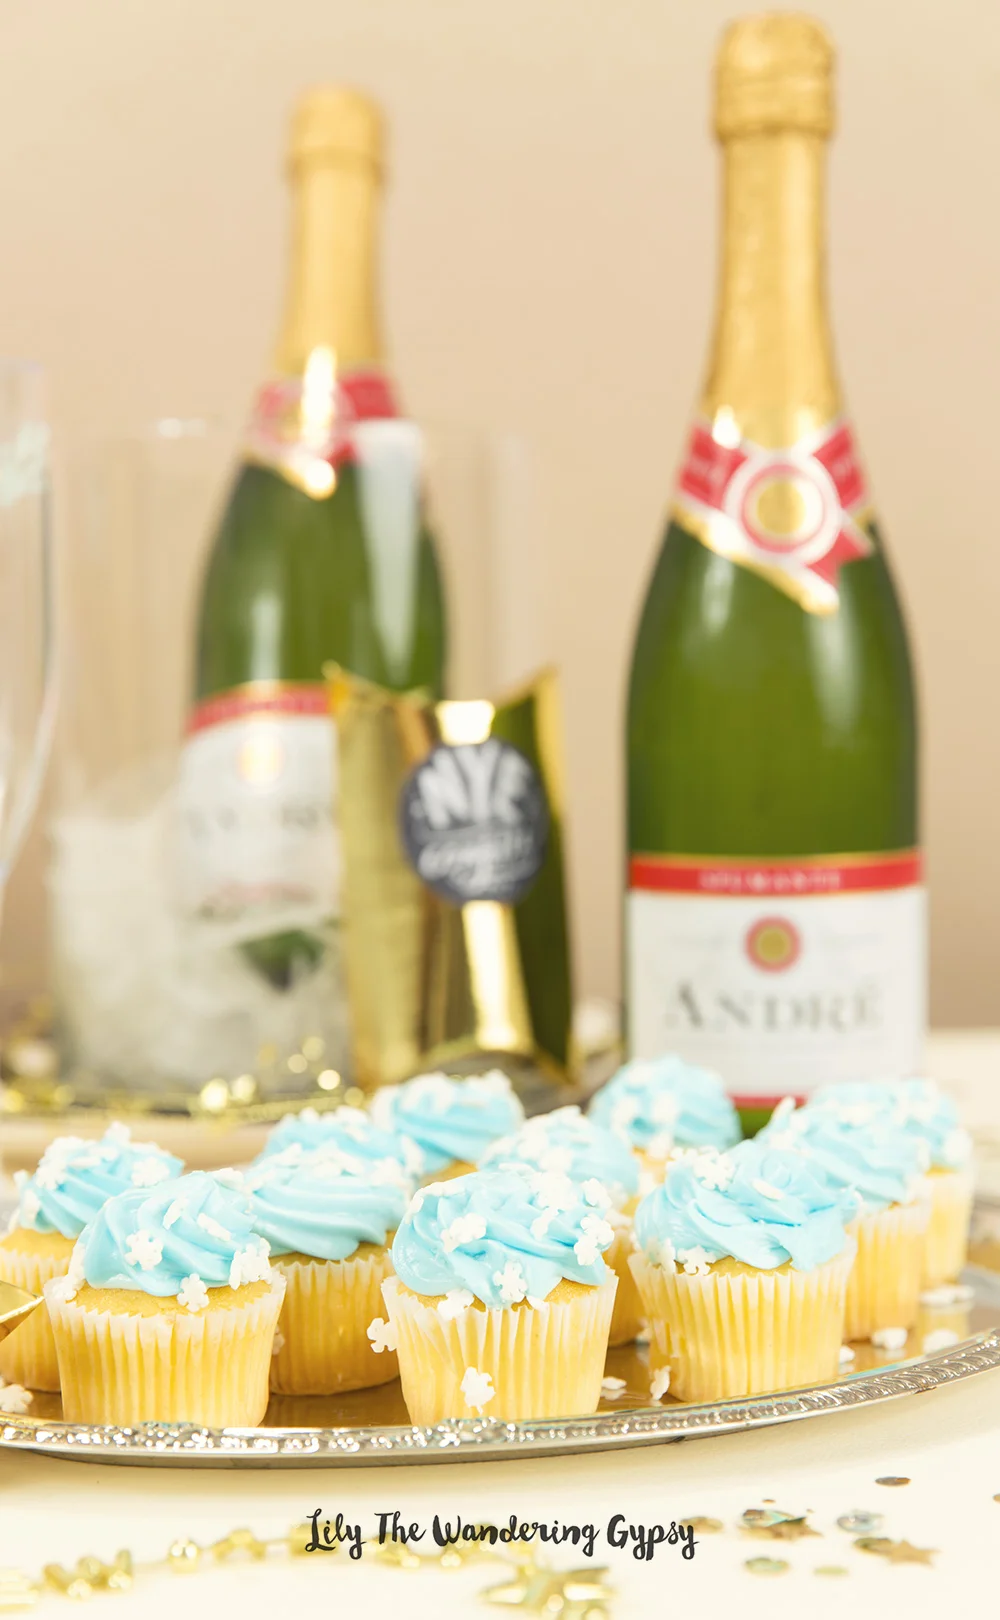
Note: This post wasn't sponsored, I just wanted to showcase how you could use just about any sparkling wine to achieve this type of party decor and look! 

NYE
NYE
NYE

Awesome Sugar Cookies From Scratch!

Sugar cookies are some of my absolute favorite cookies of all time. Especially when there's a little bit of icing and sprinkles on top. Cant beat it! This holiday season, I spent a little bit more time than I usually would, just making cookies from scratch. It was so much fun spending Christmas at home this year (I traveled to see family a couple of days in advance this year). 

Super Tasty Sugar Cookies Recipe

So, these cookies represent new traditions, as well as just plain awesome and tasty treats. 

Super Tasty Sugar Cookies Recipe

INGREDIENTS

3 C. Flour

1/2 tsp baking powder

1/2 tsp salt

2 sticks butter (at room temp or softened - but not melted)

1 1/3 C. sugar

2 eggs

2 tsp vanilla

Cookie Cutters

Super Tasty Sugar Cookies Recipe

INSTRUCTIONS

1.) Mix the three dry ingredients and set aside.

2.) Once butter is softened, beat Butter for about 2 minutes, until fluffy. Add in sugar and mix about 2-3 more minutes. 

3.) Add 1 egg at a time, and vanilla, and beat about 2 more minutes. 

4.) slowly add dry ingredient mixture, and beat until combined and a dough forms.

5.) Wrap in plastic wrap and refrigerate for at least 1 hour (or even overnight is fine).

6.) Once dough has chilled, unwrap, and let the dough sit out to warm up a bit, about 30 minutes - 1 hour. 

7.) Place dough between 2 pieces of paper - parchment on bottom, and waxed paper on top - (making sure to put flour above and below dough). Get two magazines, that are about 1/4" thick, lay them on either side of the dough, but ON TOP of the waxed paper sheet. This will ensure you don't get dough on your magazines! 

8.) Roll out dough to be about 1/4" thick, remove waxed paper from top, and cut out shapes from dough. I used a fork and a spatula to remove excess dough from around shapes. 

9.) Put the shapes onto another cookie sheet or cutting board, and freeze shapes while you cut the next ones.

10.) Re-roll dough again, about 1/4" thick, and cut more shapes. Repeat the process of cutting shapes and freezing them as you go.

11.) Preheat oven to 350 degrees F. Bake shapes, spread out on a cookie sheet, one batch at a time. Make sure to leave lots of room around each shape, just in case they spread out a little bit. If you do all the steps correctly, and take your time, the shapes should stay about the same size, just puff up a bit. 

12.) Use your favorite icing recipe, or I actually used some Funfetti icing, because I love the sprinkle colors :) I added a few drops of blue food coloring to achieve this pretty pastel blue color. Enjoy!!

Super Tasty Sugar Cookies Recipe

e.l.f. #PlayBeautifully - December Makeup Finds

I hope you got a chance to check out my November post for e.l.f. - Now, I have a few more awesome products to show you! 

#PlayBeautifully with e.l.f. and Lily The Wandering Gypsy

The most interesting items in this post would have to be the Eye Liner and the Sculpting Face Brush. The Eye Liner looks a bit like a marker at first glance, but it will definitely give you a couple of options. Either a more polished every day look, or a more dramatic cat-eye for a more glam look. The Eye Liner would be perfect for a road trip, or a flight, because it's super compact, and would not be messy at all. The Sculpting Face Brush has more compact bristles, so I think it would be perfect for bronzer to sculpt your makeup look. 

#PlayBeautifully with e.l.f. and Lily The Wandering Gypsy

I thought that a glittery background would be perfect for this makeup, because a little glitter and glam never hurt anybody! I love the way our studio lights make the products pop. The e.l.f. packaging has always appealed to me. Love that chic black and white look to it all. 

#PlayBeautifully with e.l.f. and Lily The Wandering Gypsy

I think the New Year is a perfect time to take a look at our makeup bags, and refresh them! Add a few of these e.l.f. products to your daily or night-out routine, and you can try out all the new looks you've been seeing on Pinterest for under $10! 

#PlayBeautifully with e.l.f. and Lily The Wandering Gypsy

The products pictured in this post are as follows: Sculpting Face Brush, 3-in-1 Mascara, Clay Eye Shadow Palette (in Smoked Perfection), Extra Thick Ink Eyeliner, and the Long-Lasting Lustrous Eyeshadow (in Toast).

Disclosure: e.l.f. sent me these products so I could share them with you. I hope you enjoy!!! 

New Year's Resolution Cocktails {Roundup}

I thought it would be fun to put together a list of cocktails inspired by common New Year's Resolutions. 

If you want a classic cocktail that just might inspire you to read a new novel or two, this Earnest Hemingway Daiquiri by Gabriel Cabrera, would be a good fit.  

If you want a classic cocktail that just might inspire you to read a new novel or two, this Earnest Hemingway Daiquiri by Gabriel Cabrera, would be a good fit.  

We could all use a little bit more of the green variety in our diets, so here is a rather unusual Spicy BLT Green Bloody Mary by Heather Christo

If you are making it a top priority to make date night more fun this year, this Chocolate Stout and Raspberry Cocktail by Drool Worthy Daily may be a great addition to a meaningful evening. 

If you are making it a top priority to make date night more fun this year, this Chocolate Stout and Raspberry Cocktail by Drool Worthy Daily may be a great addition to a meaningful evening. 

I always believe that wine and sparkling wine are great, mood-boosting options when getting together with girlfriends. This Apple Pear Cocktail by Julie Blanner would be a great choice! 

If you feel like booze just makes you sleepy, try something mixed with coffee! Here is a fun Creamy Coconut Rum Iced Coffee by Heather Christo.

If you feel like booze just makes you sleepy, try something mixed with coffee! Here is a fun Creamy Coconut Rum Iced Coffee by Heather Christo.

They say that one way to get the creative juices flowing is to drink absinthe. I guess the taste alone is almost unbearable, but hey, let's try this mixed drink and see if we can't get a bit creative. Here is the Sleepy Hollow Cocktail by The Jewels…

They say that one way to get the creative juices flowing is to drink absinthe. I guess the taste alone is almost unbearable, but hey, let's try this mixed drink and see if we can't get a bit creative. Here is the Sleepy Hollow Cocktail by The Jewels Of NY.

If travel is top on your list for 2016, try this Modern Mai Tai with Hibiscus + Thyme by With Food And Love, maybe it will inspire you to make plans to head somewhere warm, Hawaii for instance?!

If travel is top on your list for 2016, try this Modern Mai Tai with Hibiscus + Thyme by With Food And Love, maybe it will inspire you to make plans to head somewhere warm, Hawaii for instance?!

If one of your goals for the new year is to stop and smell the roses, then this Cardamom Rose Gin & Tonic by The Baking Bird may be perfect for you! 

If one of your goals for the new year is to stop and smell the roses, then this Cardamom Rose Gin & Tonic by The Baking Bird may be perfect for you! 

Why not learn how to infuse your drinks with new flavors, by learning how to Make Your Own Bitters, with this nice tutorial by How Sweet It Is. 

Why not learn how to infuse your drinks with new flavors, by learning how to Make Your Own Bitters, with this nice tutorial by How Sweet It Is

This Low-Cal Cocktail by Waiting On Martha, would be one of the drinks with the lowest calories, in my mind. Instead of using anything pre-mixed, opt for fresh ingredients! 

This Low-Cal Cocktail by Waiting On Martha, would be one of the drinks with the lowest calories, in my mind. Instead of using anything pre-mixed, opt for fresh ingredients! 

Happy 2016!

Soft Gingerbread Cookies Recipe

I know this post is a few days after Christmas, but I absolutely LOVE how these turned out! I could eat them all at once, but they do have a bit of a stronger taste to them than most of the cookies I make, so I have to pace myself :) These cookies were also a little bit involved, so just a warning! They took us working on them throughout the evening, but it was so fun! And the dough need to chill for about 3 hours, so you could let the dough chill overnight if you want. Original Recipe Found Here. 

Lily The Wandering Gypsy

These hardly need any decorating or icing, they are perfect just the way they are! They were so fun to make, and I have always been so enamored by the beautiful color of gingerbread dough. What a beautiful color! 

That amazing color I'm talking about comes from one of the main ingredients - Molasses! This was our first time ever using this stuff in anything, and it was very easy to use.  I found it at our local Co-Op, for about $5.99, but here is the best price I found online. 

Lily The Wandering Gypsy

INGREDIENTS:

3 cups all-purpose flour
1 teaspoon baking soda
3/4 teaspoon ground cinnamon
3/4 teaspoon ground ginger
1/2 teaspoon ground allspice
1/2 teaspoon ground cloves
1/2 teaspoon salt
1/4 teaspoon freshly milled black pepper
8 tablespoons (1 stick) unsalted butter, at room temperature
1/4 cup vegetable shortening, at room temperature (I used more butter here)
1/2 cup packed light brown sugar
2/3 cup unsulfured molasses
1 large egg

Lily The Wandering Gypsy

INSTRUCTIONS:

Position the racks in the top and bottom thirds of the oven and preheat to 350 degrees F.

Sift the flour, baking soda, cinnamon, ginger, allspice, cloves, salt and pepper through a wire sieve into a medium bowl. Set aside.

In a large bowl, using a hand-held electric mixer at high speed, beat the butter and vegetable shortening until well-combined, about 1 minute. Add the brown sugar and beat until the mixture is light in texture and color, about 2 minutes. Beat in the molasses and egg. Using a wooden spoon, gradually mix in the flour mixture to make a stiff dough. Divide the dough into two thick disks and wrap each disk in plastic wrap. Refrigerate until chilled, about 3 hours. (The dough can be prepared up to 2 days ahead.)

To roll out the cookies, work with one disk at a time, keeping the other disk refrigerated. Remove the dough from the refrigerator and let stand at room temperature until just warm enough to roll out without cracking, about 10 minutes. (If the dough has been chilled for longer than 3 hours, it may need a few more minutes.) Place the dough on a lightly floured work surface and sprinkle the top of the dough with flour. Roll out the dough 1/8 inch thick, being sure that the dough isn't sticking to the work surface (run a long meal spatula or knife under the dough occasionally just to be sure, and dust the surface with more flour, if needed). For softer cookies, roll out slightly thicker. Using cookie cutters, cut out the cookies and transfer to nonstick cookie sheets, placing the cookies 1 inch apart. Gently knead the scraps together and form into another disk. Wrap and chill for 5 minutes before rolling out again to cut out more cookies.

Bake, switching the positions of the cookies from top to bottom and back to front halfway through baking, until the edges of the cookies are set and crisp, 10 to 12 minutes. Cool on the sheets for 2 minutes, then transfer to wire cake racks to cool completely. Decorate with Royal Icing. (The cookies can be prepared up to 1 week ahead, stored in airtight containers at room temperature.)

For The Icing - I only had a tiny bit of powdered sugar. So, I basically mixed a few Tbsp of powdered sugar with a splash of milk and a bit of corn syrup to thicken it up. It was more like a glaze, though. For the decorations, I used three sprinkles as buttons. 

Lily The Wandering Gypsy

Well, I hope you enjoy these cookies! They took a lot of work, but wow, did they turn out well! Enjoy!

Red Cocktail Recipes

I wanted to share a few cocktail recipes with you today in honor of the holidays! 

Red Drink Recipes

NAUGHTY ROUDOLPH

1/4 cup Mario cherries, pretzels, 1 C. Ginger Ale, 2 Cups Ice, 3 oz. Vanilla Vodka

HOLIDAY SANGRIA

Cut up fruit (Apple, Orange, and Strawberries). Mix 1/2 C. Brandy, 1 Bottle Dry Red Table Wine, 1/4 Cup Sugar, and 1/4 C. Water. Add cut up fruit and enjoy! 

STRAWBERRY HOLIDAY PUNCH

Mix together Equal Parts Ginger Ale and Cranberry Juice. Next, add a few scoops of raspberry sorbet, and some fresh raspberries, and optional alcohol. Enjoy! 

Frozen Hot Chocolate Pie Recipe

I am writing this as I eat a piece of this magical pie! I love how it turned out, and now I have a chocolatey treat for days to come. The best part is that this pie was incredibly easy to make, and the ingredients cost less than $5! 

No-Bake Chocolate Pie Recipe

INGREDIENTS:

1 Pie Crust, Cool Whip, Chocolate Pudding (Instant), Milk

INSTRUCTIONS:

Mix 2 Cups milk into pudding and stir, Let sit for about 5 minutes. 

Add 1 Cup of the Chocolate Pudding into the bottom of the pie crust, and smooth out. 

Mix 1 Cup Cool Whip into the rest of the pudding and stir until well combined. Add this mixture to the pie crust and smooth out.

Now, put some of the extra Cool Whip into a small Ziploc bag and cut end off. Practice first, but dollop little dots of Cool Whip around the edges of the pie. Feel free to decorate with sprinkles for a more festive look! Freeze for 1 hour, and slice yourself some chocolate pie! If you freeze it overnight, it will be more the consistency of a pudding pop. So good either way! Enjoy!!!

No-Bake Chocolate Pie Recipe

Celebrate The Holidays With Nature Hills Nursery

I love my newest addition to my plant family! This Colorado Blue Spruce is just the right size, and I am going to plant it after the holidays. See, I'm the type of person who despises seeing live-cut Christmas trees on the curb less than a week after Christmas. It almost makes me cringe, knowing that the tree could have just been taken home with the roots in tact, in hopes of planting a tree in your yard or in a nearby park or nature preserve. 

These cute mini trees from Nature Hills Nursery would really make a wonderful gift! The Quart Sized Blue Spruce, pictured below, can be found here

Living Tree

And, here is a cute way to display your mini tree - I found this amazing silver serving tray at an antique shop and absolutely LOVE it! Place the tree in a galvanized metal bucket, set the tree onto the silver tray, and place as many vintage ornaments as you can onto the tray. I love how everything looks so classic and sparkles so beautifully! I also put a star-shaped cookie cutter by the silver tray for an extra bit of whimsy! 

Vintage Ornaments

A special thanks to Nature Hills Nursery for sending me this adorable Colorado Blue Spruce! I absolutely love it and am excited to see it grow huge over the next few years! 

Find Nature Hills Nursery Around The Web - { Pinterest / Instagram / Twitter / Facebook / Website }

Ugly Christmas Sweater Dog Bandana - DIY Tutorial

Looking for a last minute way to get festive this holiday season? Dress your pup in something cute and quirky. This is my take on the Ugly Christmas Sweater, but updated. Cabbie actually loved this bandana! 

Holiday Dog Bandana DIY
Dog Bandana

MATERIALS:

Solid Colored Bandana (or solid colored square of fabric that fits your dog), Sparkly Felt, Tacky Glue or Fabric Glue, Sparkly and Solid Colored Puffy Paint, Other Holiday Embellishments (I used mini flat-backed ornaments), This Template (Here), Scissors, Permanent Marker, Computer and Printer. NOTE: You can also draw your own shapes.

Holiday Dog Bandana

Cut out the paper shapes you want to use. Then, trace them onto the back of the felt. 

Holiday Dog Bandana
Holiday Dog Bandana

Iron the bandana, and position the shapes and other adornments around so they create a cool design. ** Place a newspaper between the folded bandana to catch glue! Glue the pieces down, and wait about 30 minutes to an hour for pieces to be secure. 

Holiday Dog Bandana

Now, get out your puffy paint and outline the edges of the felt shapes. Get as creative as you want with this project, I really had a lot of fun! 

Holiday Dog Bandana
Holiday Dog Bandana
Holiday Dog Bandana

Happy Holidays from Cabbie The Chocolate Lab and Lily The Wandering Gypsy! XOXO!

Dog Bandana

DIY Bloggers Who Are Rocking The Holidays

I am constantly inspired by those bloggers who are always making new things, on a daily basis! I do hope to become one of those women some day soon, I am working on it as a major New Year's Resolution. None of these images are mine, but they are some of my current inspirations! If I have missed any super amazing bloggers, please comment below with a link. Thanks! 

Fall For DIY - Star Tree Topper

Fall For DIY - Star Tree Topper

DesignLoveFest - Wooden Beaded Garland

DesignLoveFest - Wooden Beaded Garland

West Elm Blog - Beet Dyed Name Tags

West Elm Blog - Beet Dyed Name Tags

West Elm Blog - Gold Leaf Trees

West Elm Blog - Gold Leaf Trees

Paper N Stitch - Gift Wrap Tutorial 

Paper N Stitch - Gift Wrap Tutorial 

Inspired By This - Gift Wrap Ideas 

Inspired By This - Gift Wrap Ideas 

 Subtle Revelry - Confetti Gift Wrap Party 

 Subtle Revelry - Confetti Gift Wrap Party 

Minted - DIY Serving Tray 

Minted - DIY Serving Tray 

More fun with JORD Wood Watches!

So, I did another photoshoot with my newest, and more favorite accessory, my JORD wood watch! (I am modeling the Fieldcrest Watch In Maple) In this post, I am also featuring some of my other favorite clothing items! Use my link here.

Outfit Post!
Great Outfit!
Outfit Idea

So, check out al of the beautiful watches that JORD has to offer here

Clementine Surfwear - Tie Dyes + Home Goods

Tie Dye is something that has always caught my eye. I love the intricacies in the colors fading into one another, and I love the amazing patterns that can be created by simply tying and folding fabric in certain ways. And, generally no two tie dyed pieces will ever be alike, just like a snowflake! A few years ago, I tried my hand at Tie Dying and it went well, but it takes a ton of hard work. My favorite part was always unwrapping my creations after they had been sitting overnight, and seeing what amazing things happened. 

So, when Carol contacted me to see if I could help her capture the beauty of her creations, I jumped at the chance to see her work in person and show you just how wonderful her work is! 

Lily The Wandering Gypsy + Clementine Surfwear

Clementine Surfwear is based in Los Angeles, and I am sure you will see that warm weather vibe in all of her work. She creates some gorgeous tie dyed clothing perfect for layering up, lounging around, heading to yoga class, or grooving at a local concert or a festival! 

Lily The Wandering Gypsy + Clementine Surfwear

Tie Dye isn't just for summer! Check out these cool weather options, and layer them up with some cute socks, boots, and a scarf! Above, the tie dyed hoodie, leggings, and beanie. 

HOODIES - LEGGINGS - BEANIE CAP - DISH TOWELS 

Above, you can see a pink long sleeve v-neck, beanie cap, two sets of leggings, and fingerless gloves! Everything is incredibly soft, and made from super nice materials. I have a feeling I will be sporting these garments for a long time! 

Lily The Wandering Gypsy + Clementine Surfwear

Another one of Carol's more recent creations are these adorable dish towels and tote bags. They say, Kiss The Cook, Drink The Wine, Kiss The Cook! These would make adorable housewarming or holiday gifts. So, check out her screen printed goods here

Lily The Wandering Gypsy + Clementine Surfwear

And, make sure to check out Clementine Surfwear on Instagram!

DIY Cotton Gift Bags

Check out my cute tutorial, to learn how to make some pretty adorable little gift bags. You can personalize any gift in minutes with these gift bags. 

Check out these adorable gift bags!

MATERIALS: 

Cotton Gift Bags, Rubber Stamps, Ink Pad, Glue (Either Tacky Glue or Fabric Glue), Sequins

Cute DIY Gift Bags

First, I recommend stamping onto a piece of paper before you stamp onto your gift bag, to make sure the design looks good. But, basically just figure out where you want your stamp to go, and carefully apply the inked stamp to your cotton bag. Press pretty hard, and make sure to not double over your design. 

Cute DIY Gift Bags
Cute DIY Gift Bags

Now, gather your glue and sequins, and make dots of glue all over the front of the gift bag. 

Cute DIY Gift Bags

And, make sure to let the gift bag dry for a few hours, before giving this to anyone. 

Cute DIY Gift Bags
Adorable DIY Gift Bag

50 Gift Ideas

I have some wonderful gift ideas for you. These items will be the ideal gift for any of the ladies in your life, young or old! 

Awesome Gift Ideas
Click Any Items (Below) To Shop!
Check Out My Holiday Wish List!

Happy Holidays!!! 

Party Dresses + Shoes

Of course, it's that time of year, when there are so many special occasions and excuses to dress up! I found a few ideas from ModCloth, that I hope will inspire you to sparkle a little brighter this year! And, since it is chilly out, I added a few warmer options for you, some adorable jackets! 

A Special Treat For Your Furry Friends! Organic Pumpkin Oatmeal Dog Treats Recipe

These treats were a real hit with my little Chocolate Lab, Cabbie. We always try to make sure we only give our dog the very best. Whether it be food, we give her Solid Gold Barking At The Moon, or what treats she gets, it is always the best we can possibly get. I was checking out different dog treat recipes, and came across this one. I love how it has only all-natural ingredients and does not contain chicken broth, salt, or sugar - these were much more mild for her tummy. 

Pumpkin Oatmeal Dog Treats Recipe

Cabbie helped me with EVERY step of this project. She absolutely loves these treats! 

Pumpkin Oatmeal Dog Treats Recipe

INGREDIENTS:

  • 3 cups oats
  • ½ cup peanut butter
  • 1 cup pumpkin puree
  • 1 teaspoon cinnamon
  • 1 teaspoon baking powder
  • 2 eggs

INSTRUCTIONS:

  • Place the oatmeal into a food processor and pulse it until it's not so coarse, but it doesn't need to be a fine as flour.
  • Add oatmeal, pumpkin, peanut butter cinnamon baking powder and eggs to bowl on mixer and blend on medium until it's all mixed.
  • Roll out with a little flour and cut with cookie cutters.
  • Bake at 375 degrees for 15-20 minutes.
  • Cool on rack until completely cooled.
  • Place in airtight container to keep them fresh, or in the freezer. I keep them in the freezer, they don't freeze solid as there is little liquid. This is important!!!
Pumpkin Oatmeal Dog Treats Recipe

Wood Watches by JORD #jordwatch

Looking for a fun gift, made in the USA? Here is a fun idea for you! I absolutely love this unique, and very well-made Wood Watch By JORD. I am sharing the Fieldcrest Watch in Maple! It is absolutely gorgeous, it's one of the nicest pieces of jewelry I own. 

JORD Wood Watches

See how I styled up this cute watch for the holidays, and check out our very first Stop Motion video!!! So happy with the outcome, and cannot wait to create another :)

JORD Wood Watches
Lily The Wandering Gypsy + JORD Wood Watches
Wood Watches by JORD #jordwatch
JORD Wood Watch

Make sure to check out JORD Wood Watches around the web!

Website - FacebookInstagram - #jordwatch - Pinterest

Amazing Oatmeal Raisin Cookies Recipe

These cookies tasted beyond good, and made the house smell like a cookie candle :) I wanted to share some of my favorite ingredients, so you can make your Oatmeal Raisin cookies the very best ever!

Awesome Oatmeal Cookies! YUM!
5DA_1479 100.jpg

INGREDIENTS (WET):

INGREDIENTS (DRY):

Awesome Oatmeal Cookies! YUM!

INSTRUCTIONS: 

  1. Preheat oven to 350°.
  2. Melt butter in heat safe container. 
  3. Whisk dry ingredients; set aside.
  4. Combine wet ingredients with a hand mixer on low.
  5. To cream, increase speed to high and beat until fluffy and the color lightens.
  6. Stir the flour mixture into the creamed mixture until no flour is visible.
  7. (Over mixing develops the gluten, making a tough cookie.) Now add the oats and raisins; stir to incorporate.
  8. Use a silicone Tablespoon measuring spoon, and scoop out dough
  9. Drop 2-inches apart onto baking sheet sprayed with nonstick spray.
  10. Bake 11-13 minutes (on center rack), until golden, but still moist beneath cracks on top.
  11. Remove from oven; let cookies sit on baking sheet for 2 minutes before transferring to a wire rack to cool.

Awesome Oatmeal Cookies! YUM! - The melted butter and the sugar, eggs, and both sugars.

Awesome Oatmeal Cookies! YUM! - The melted butter and the sugar, eggs, and both sugars.

Here is the cookie dough before the dry ingredients are added.

Here is the cookie dough before the dry ingredients are added.

Awesome Oatmeal Cookies! YUM!

I hope you have enjoyed my process of creating some incredible Oatmeal Raisin Cookies! If you make some, I'd love to see them! Put your link below in the comments! 

https://www.pinterest.com/happysolez/pins/